How to use Bin Chutes
Step-by-step guides for the key features — from setting up a building to collecting signed access panel handovers.
Signing in
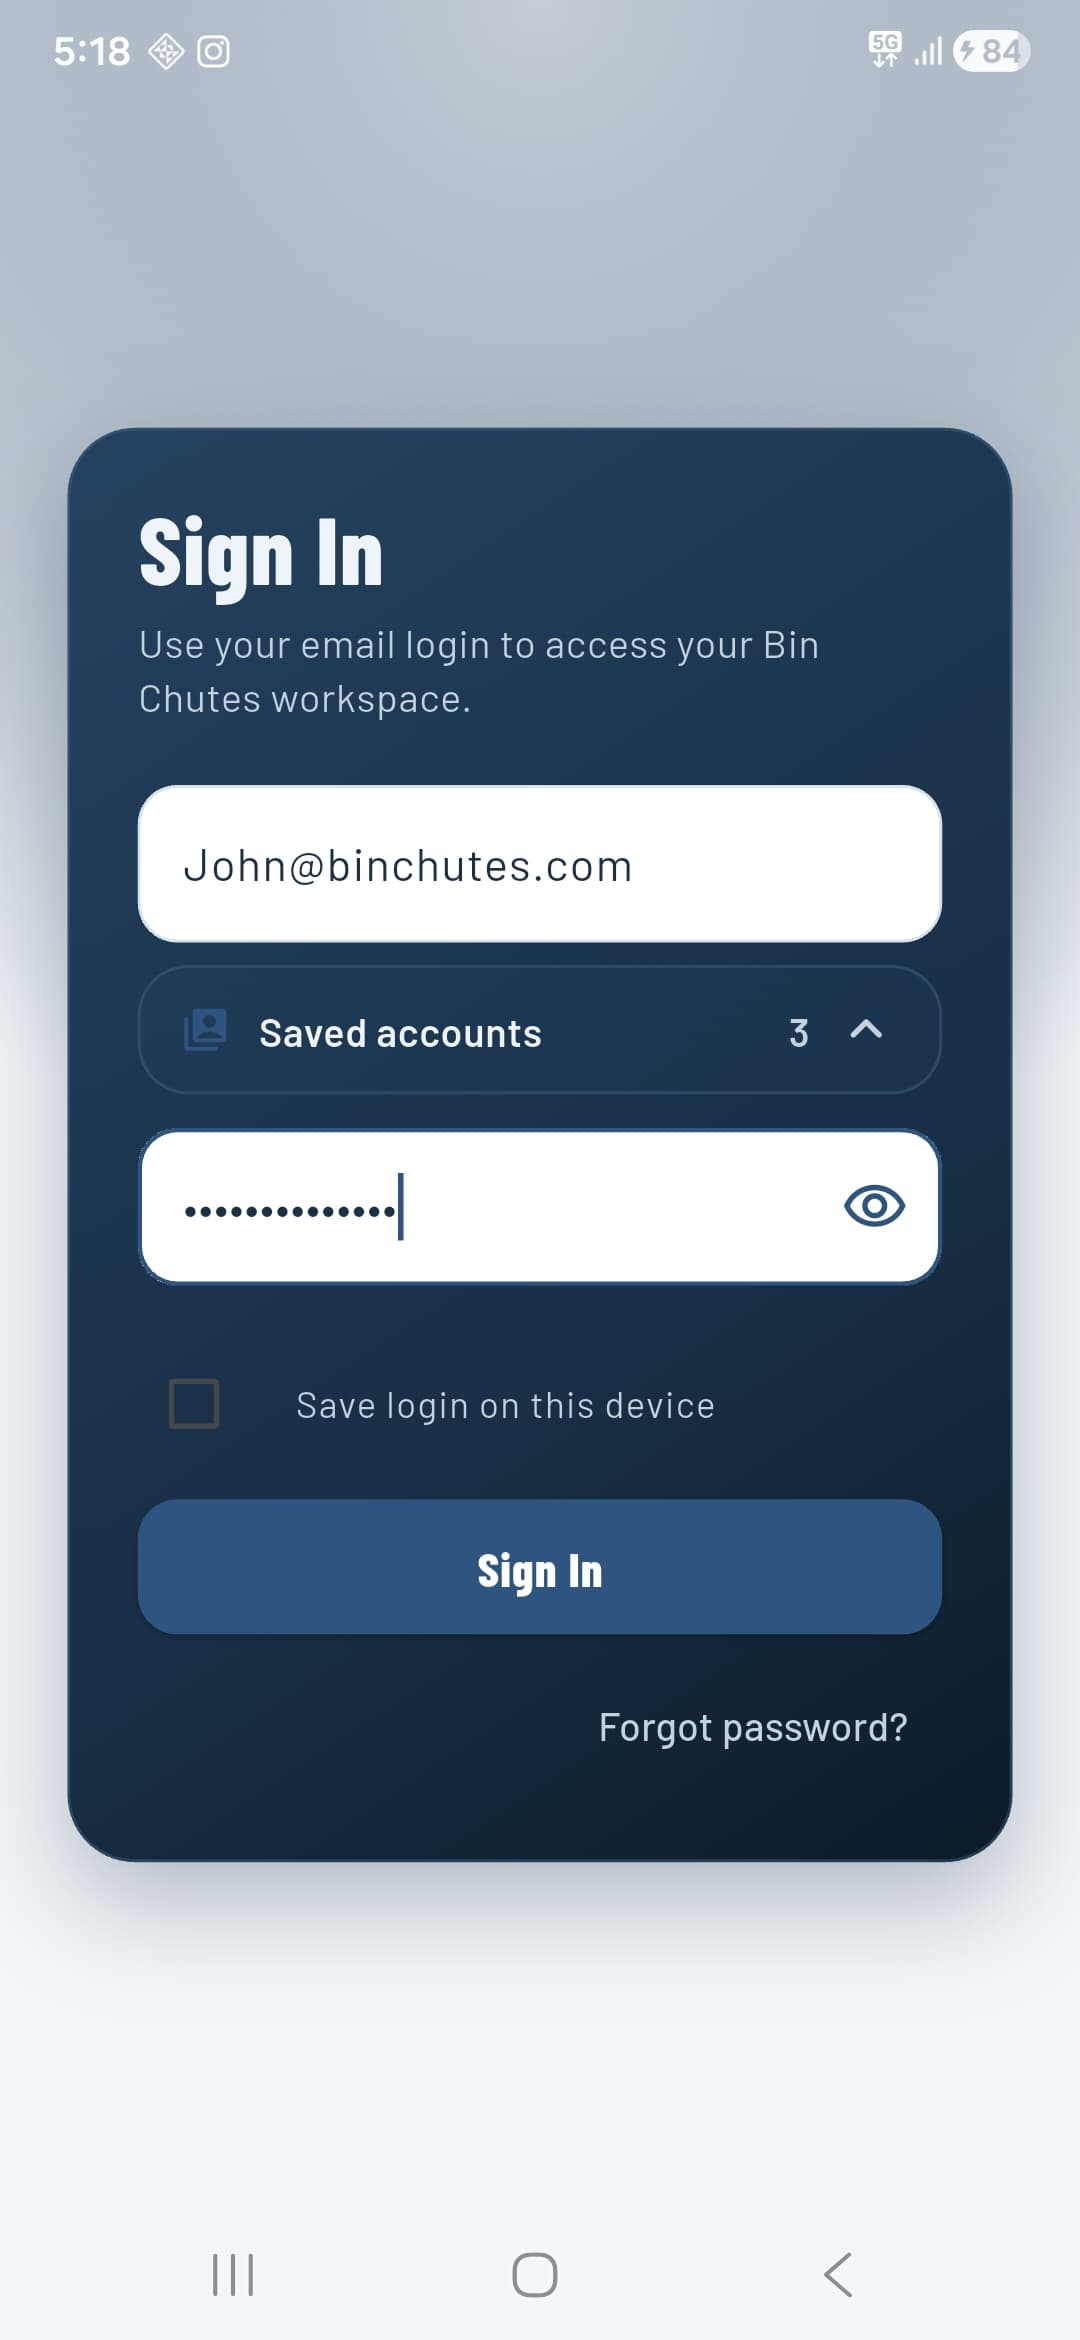
Open the app and enter the email address and password tied to your Bin Chutes account. If your organisation uses multiple workspaces, you can switch between them after signing in — your login works across all workspaces you belong to.
Tap Save login on this device to stay signed in between sessions. Use Forgot password? to receive a reset email.
Create a project
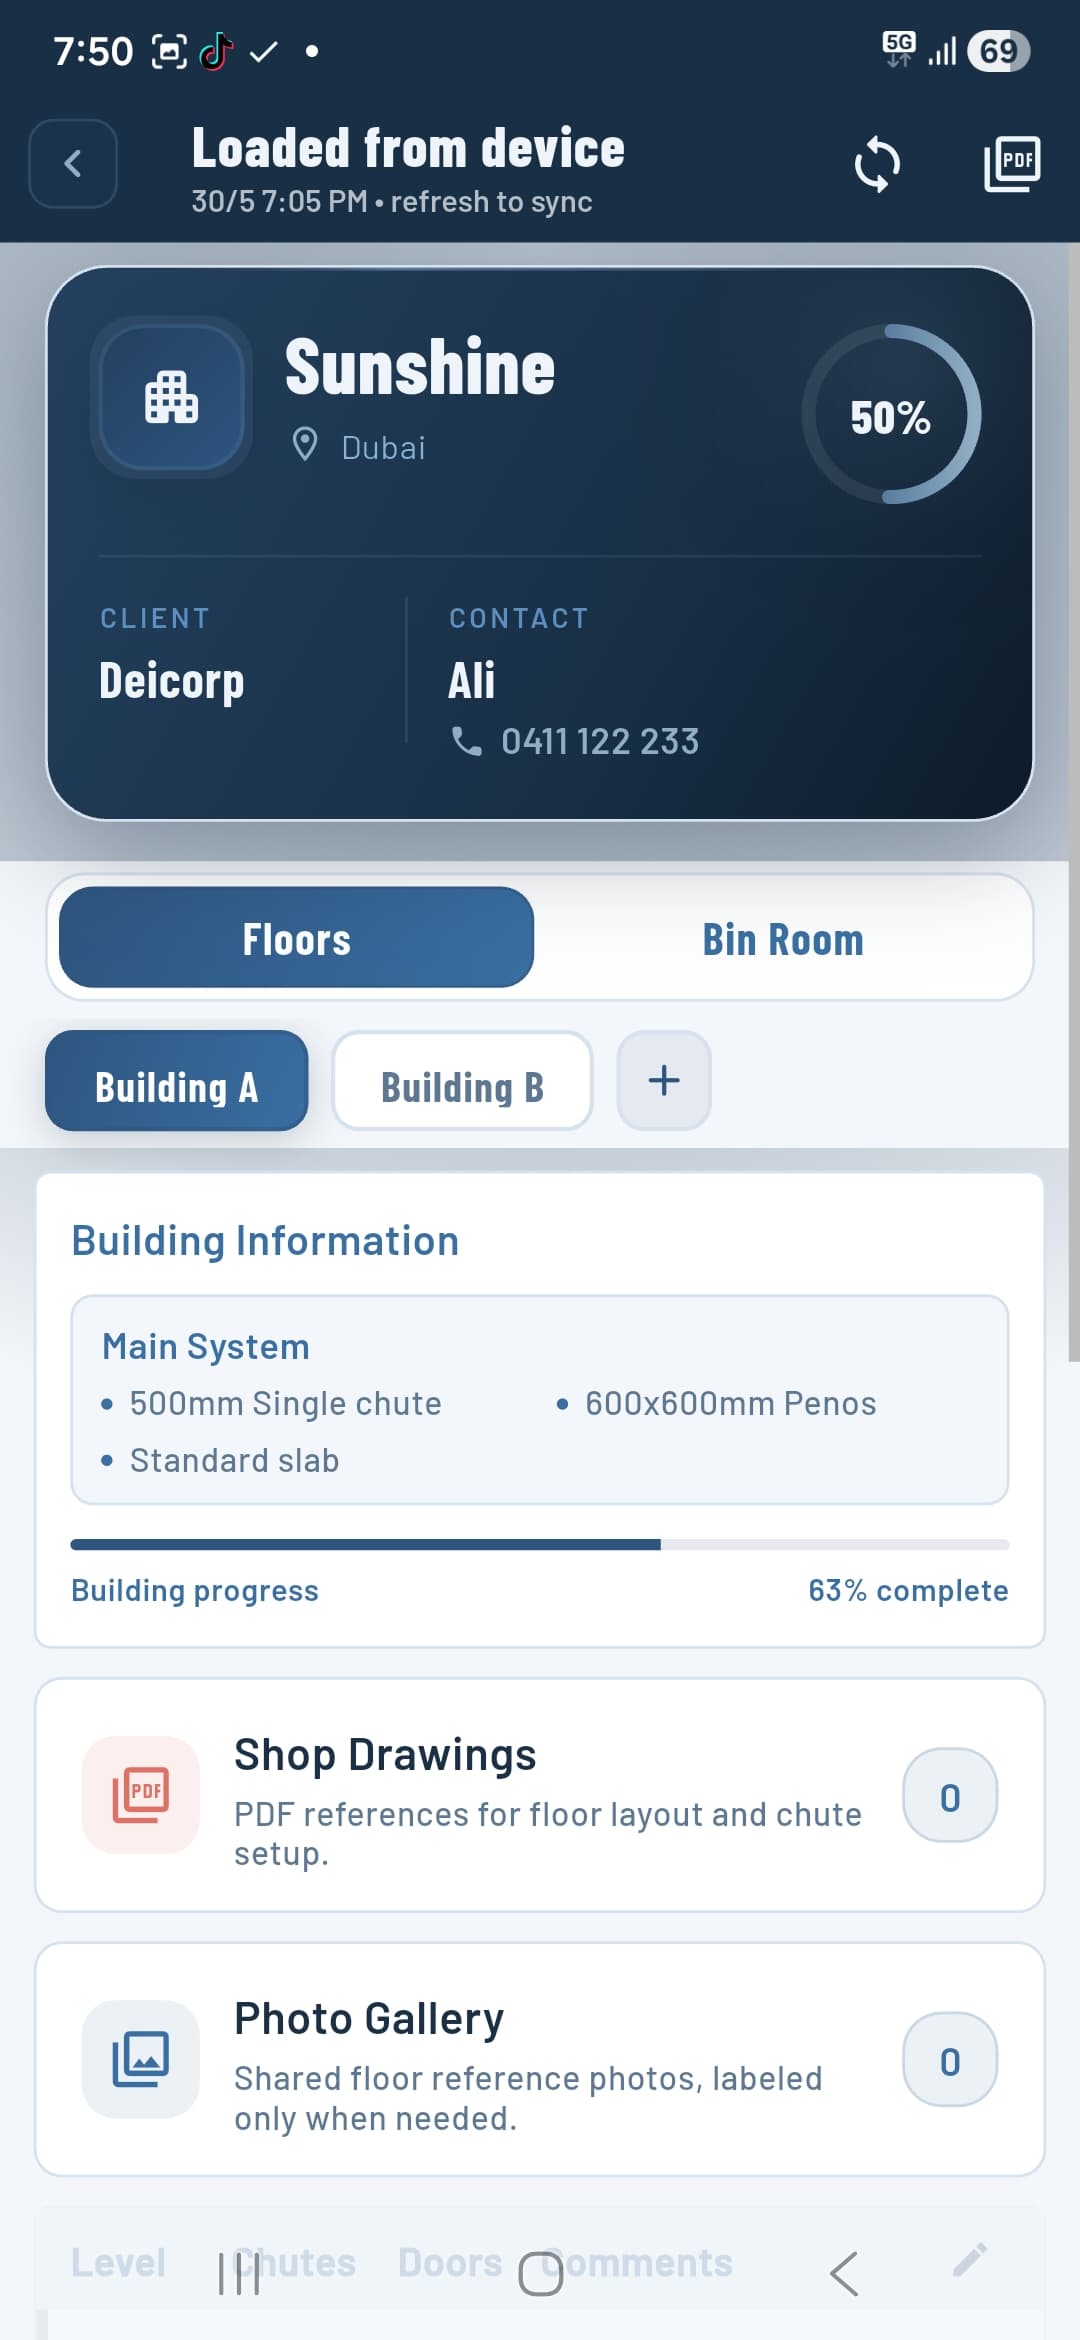
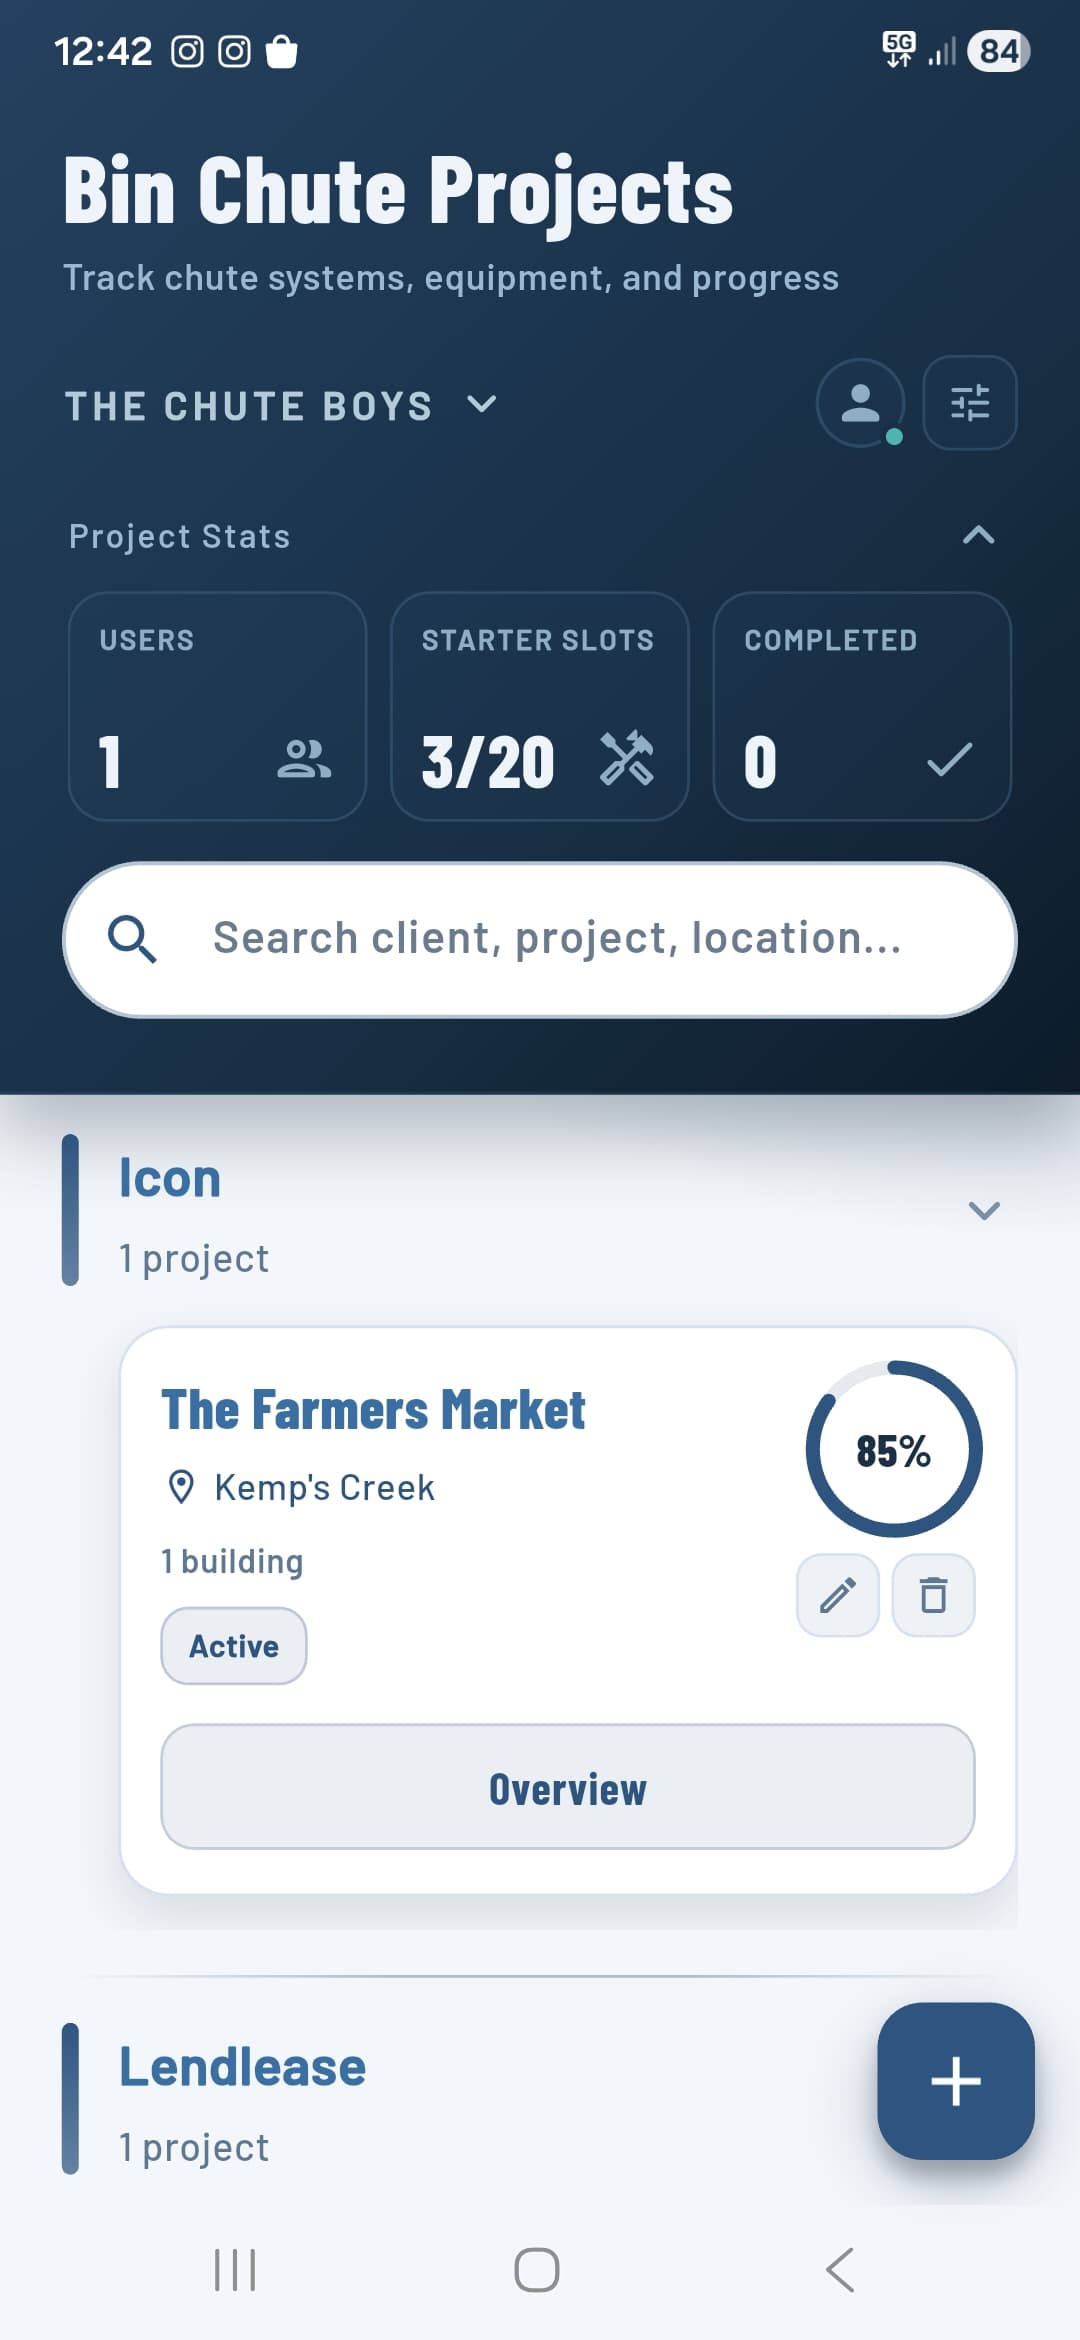
After signing in you land on the Bin Chute Projects home screen. Each project represents a job site — one project per site, with buildings added inside it.
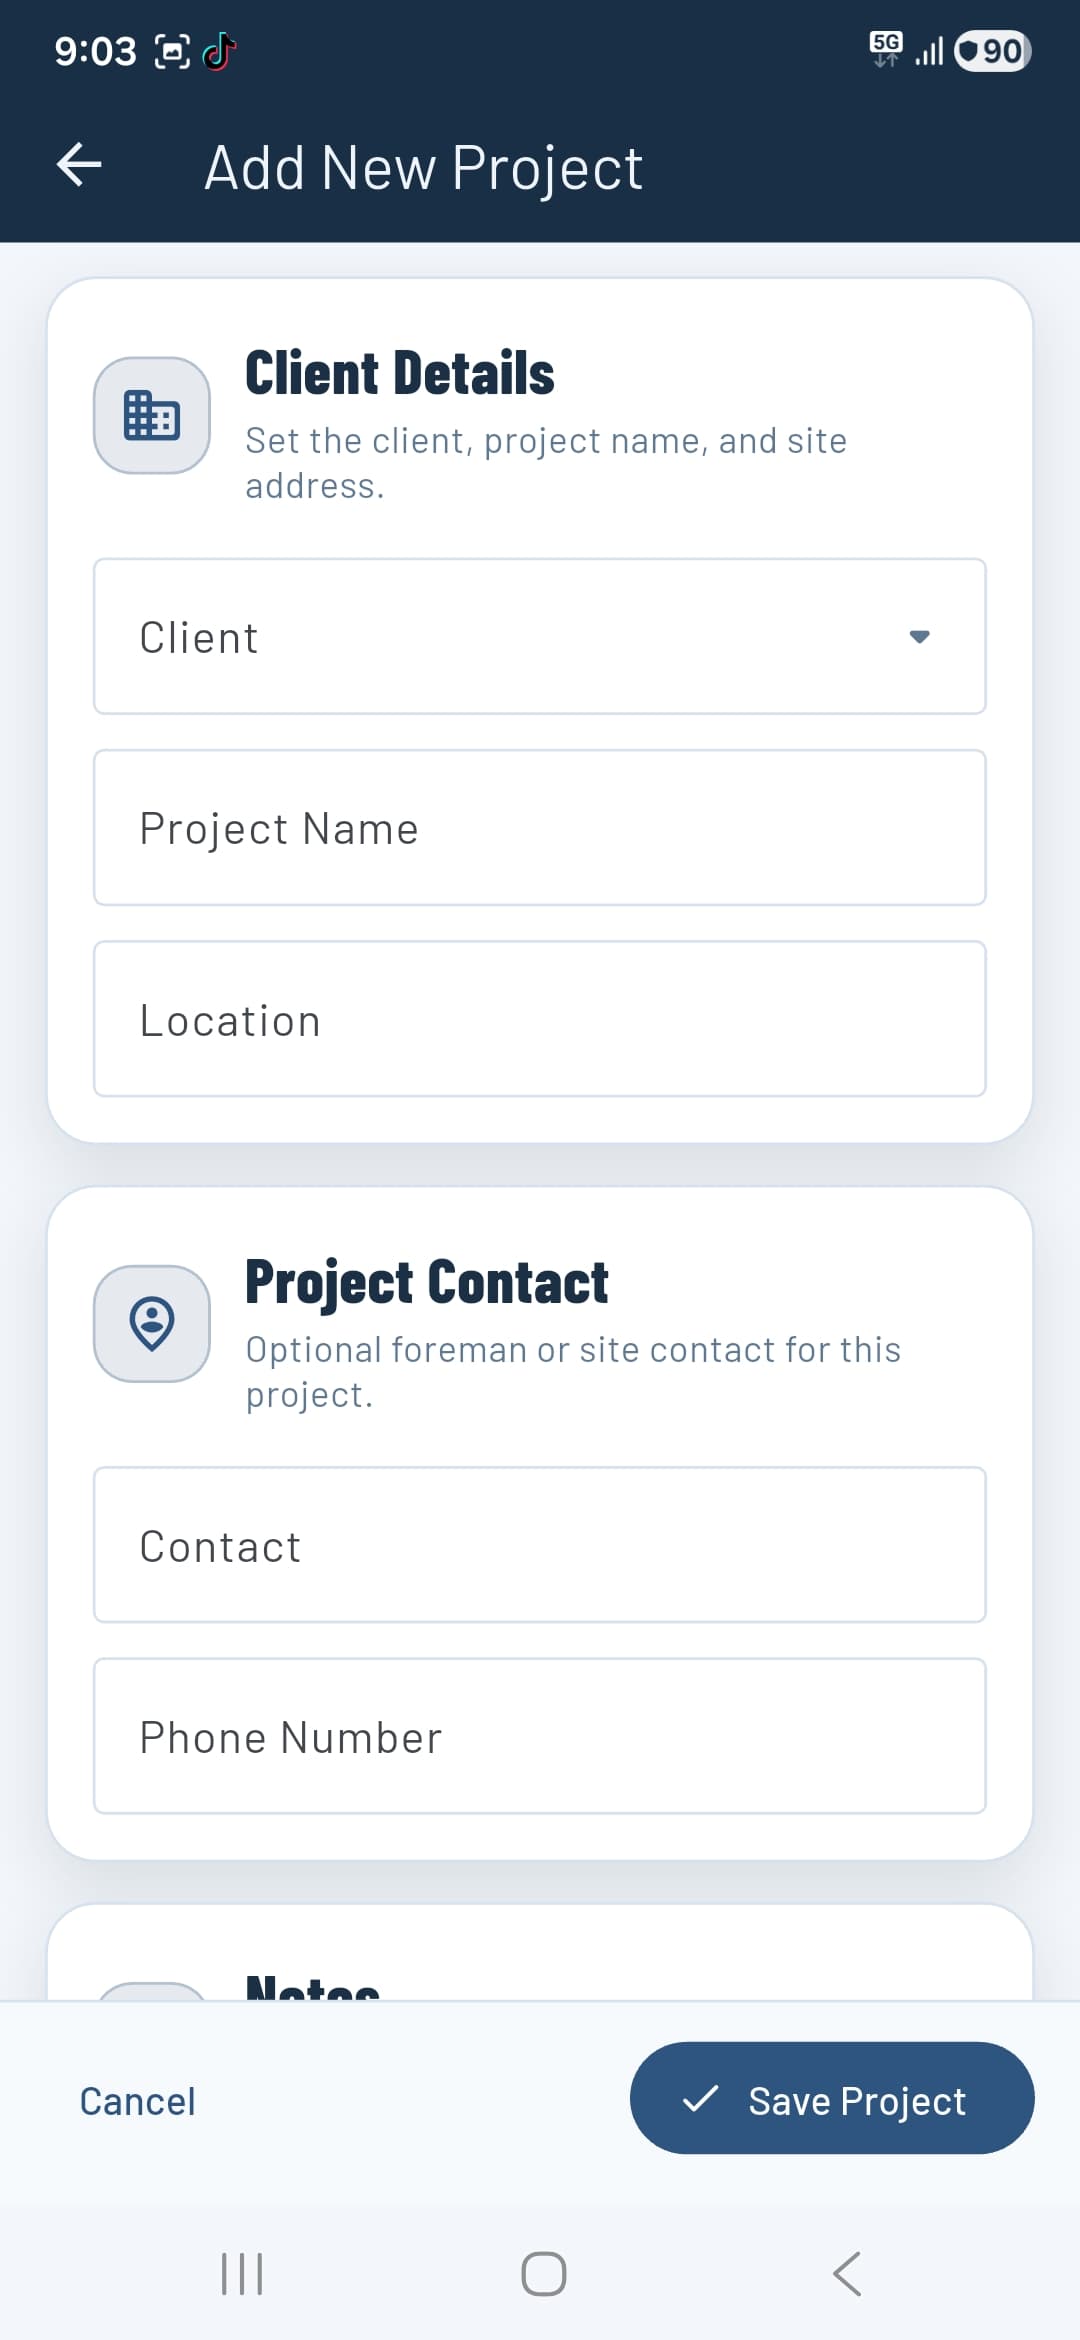
Tap the + button on the home screen to open the Add New Project form. Fill in:
- Client — Select from your existing clients or add a new one.
- Project Name — The name of the job site or development.
- Location — The site address or suburb.
- Contact — Optional — foreman or site contact name.
- Phone Number — Optional — contact phone number for the site.
- Notes — Any additional notes about the project.
Tap Save Project to create it. The project card appears on the home screen with a progress ring. Open it to start adding buildings.
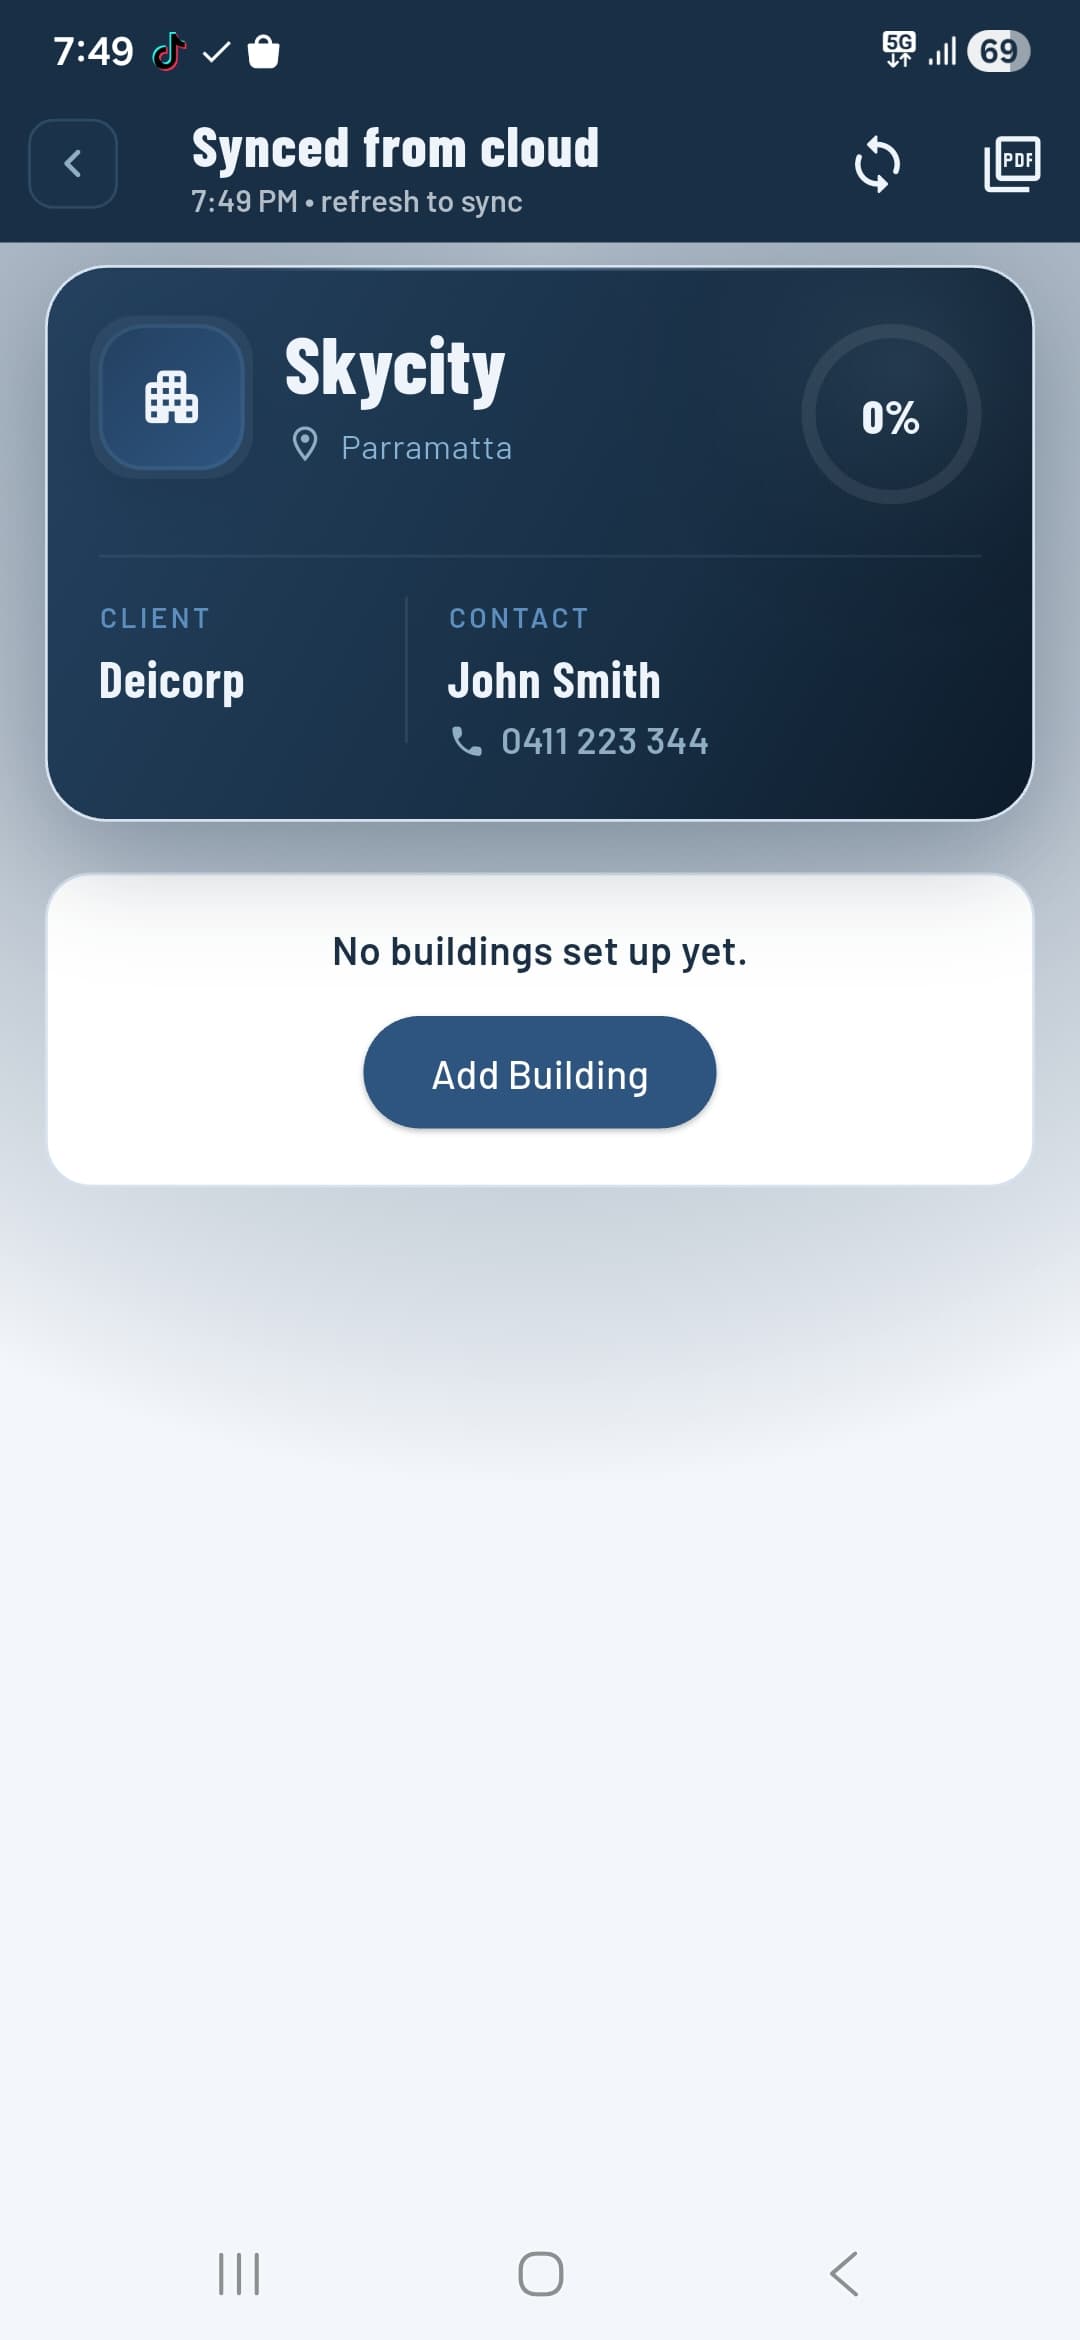
Adding a building
Open a project and tap Add Building. The wizard walks you through five tabs — complete each one and tap Next to advance.
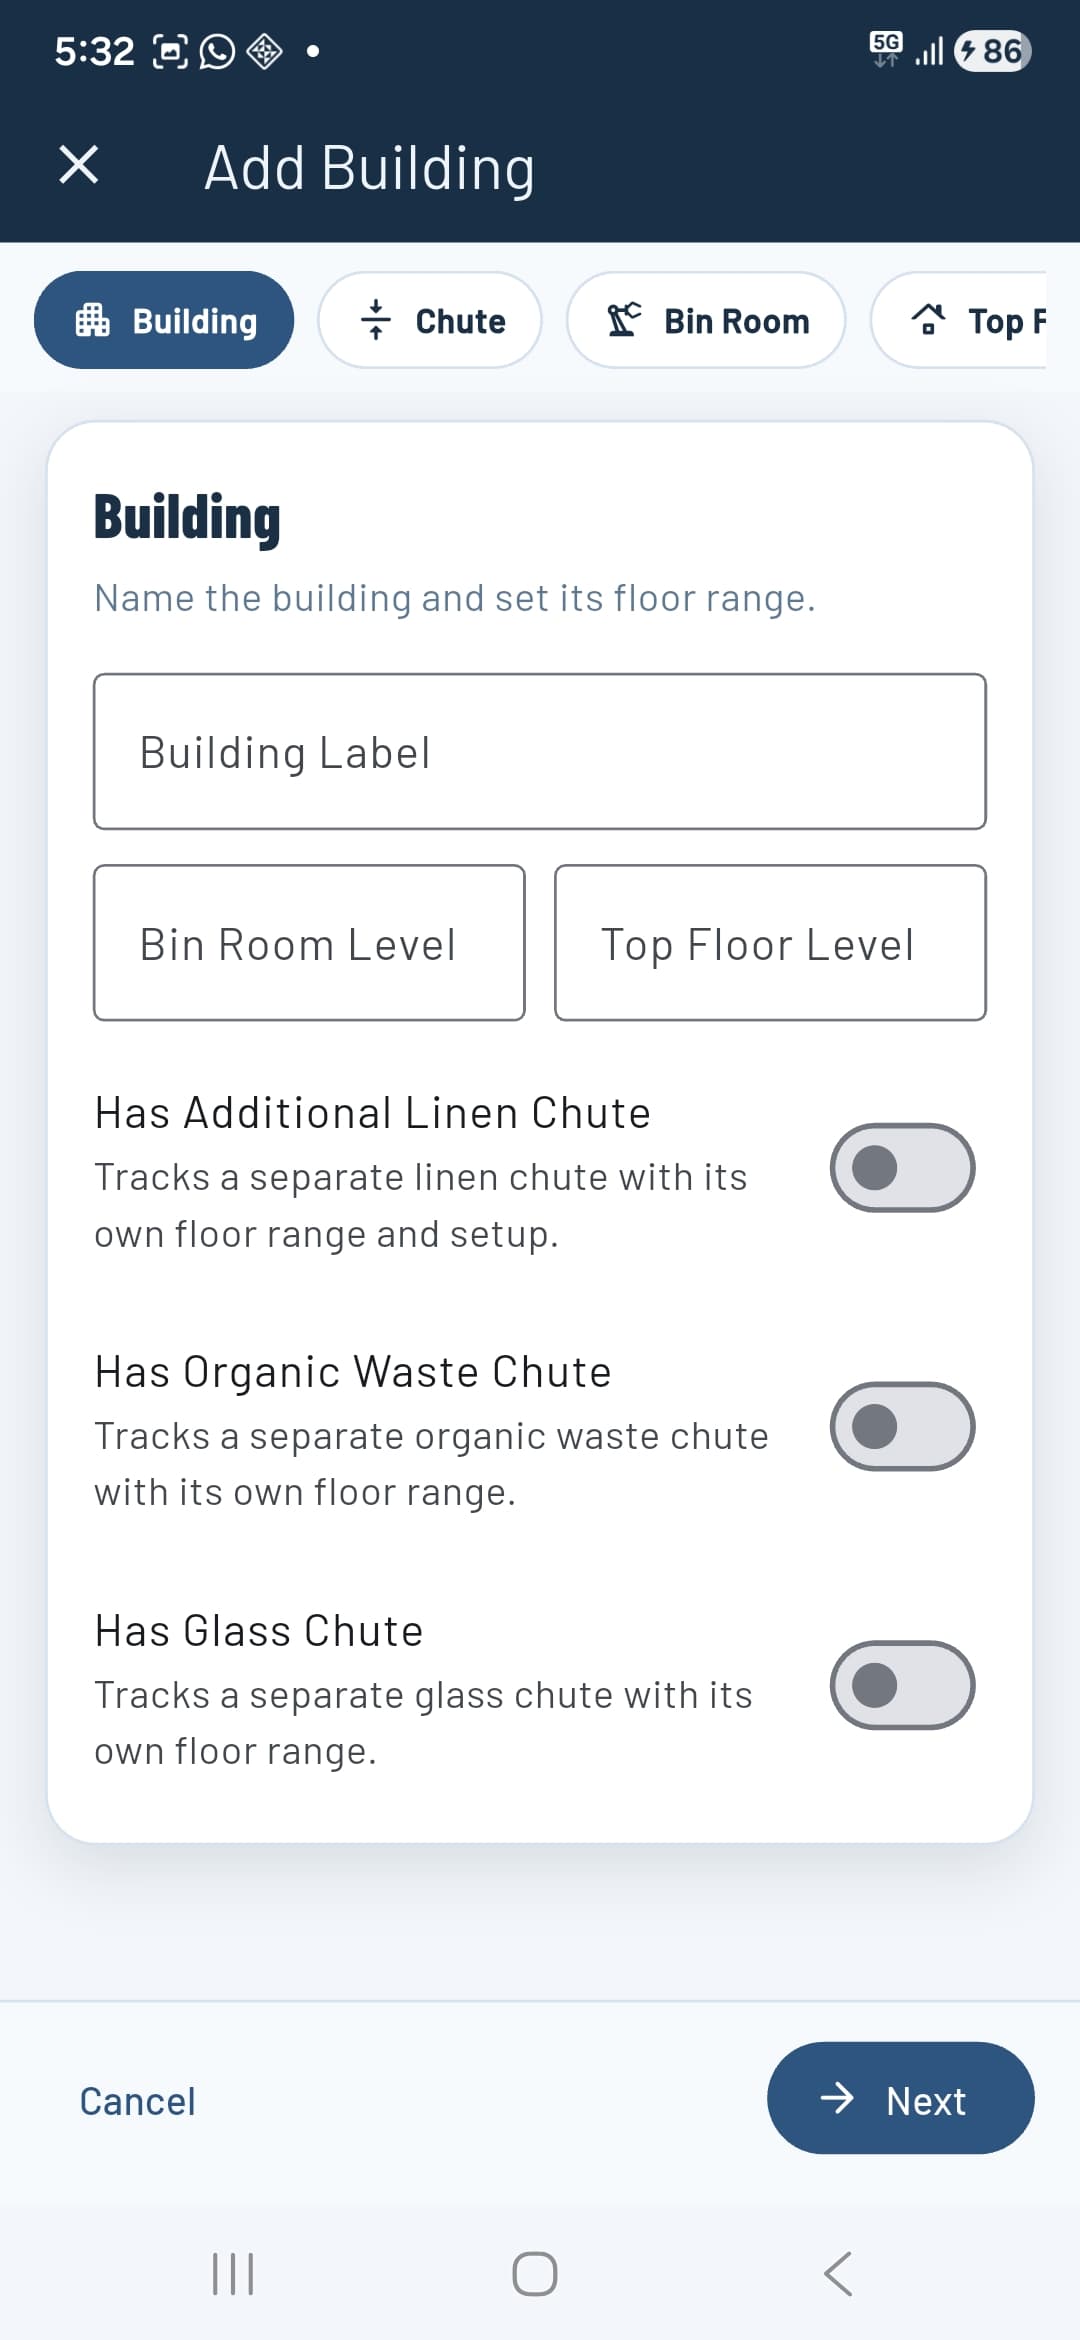
1 — Building
Give the building a label (e.g. R1), set the bin room level (e.g. B1), and the top floor (e.g. 60). Toggle on any additional chute types the building has — Linen, Organic Waste, or Glass. Each toggle adds a separate chute system with its own floor range and setup.

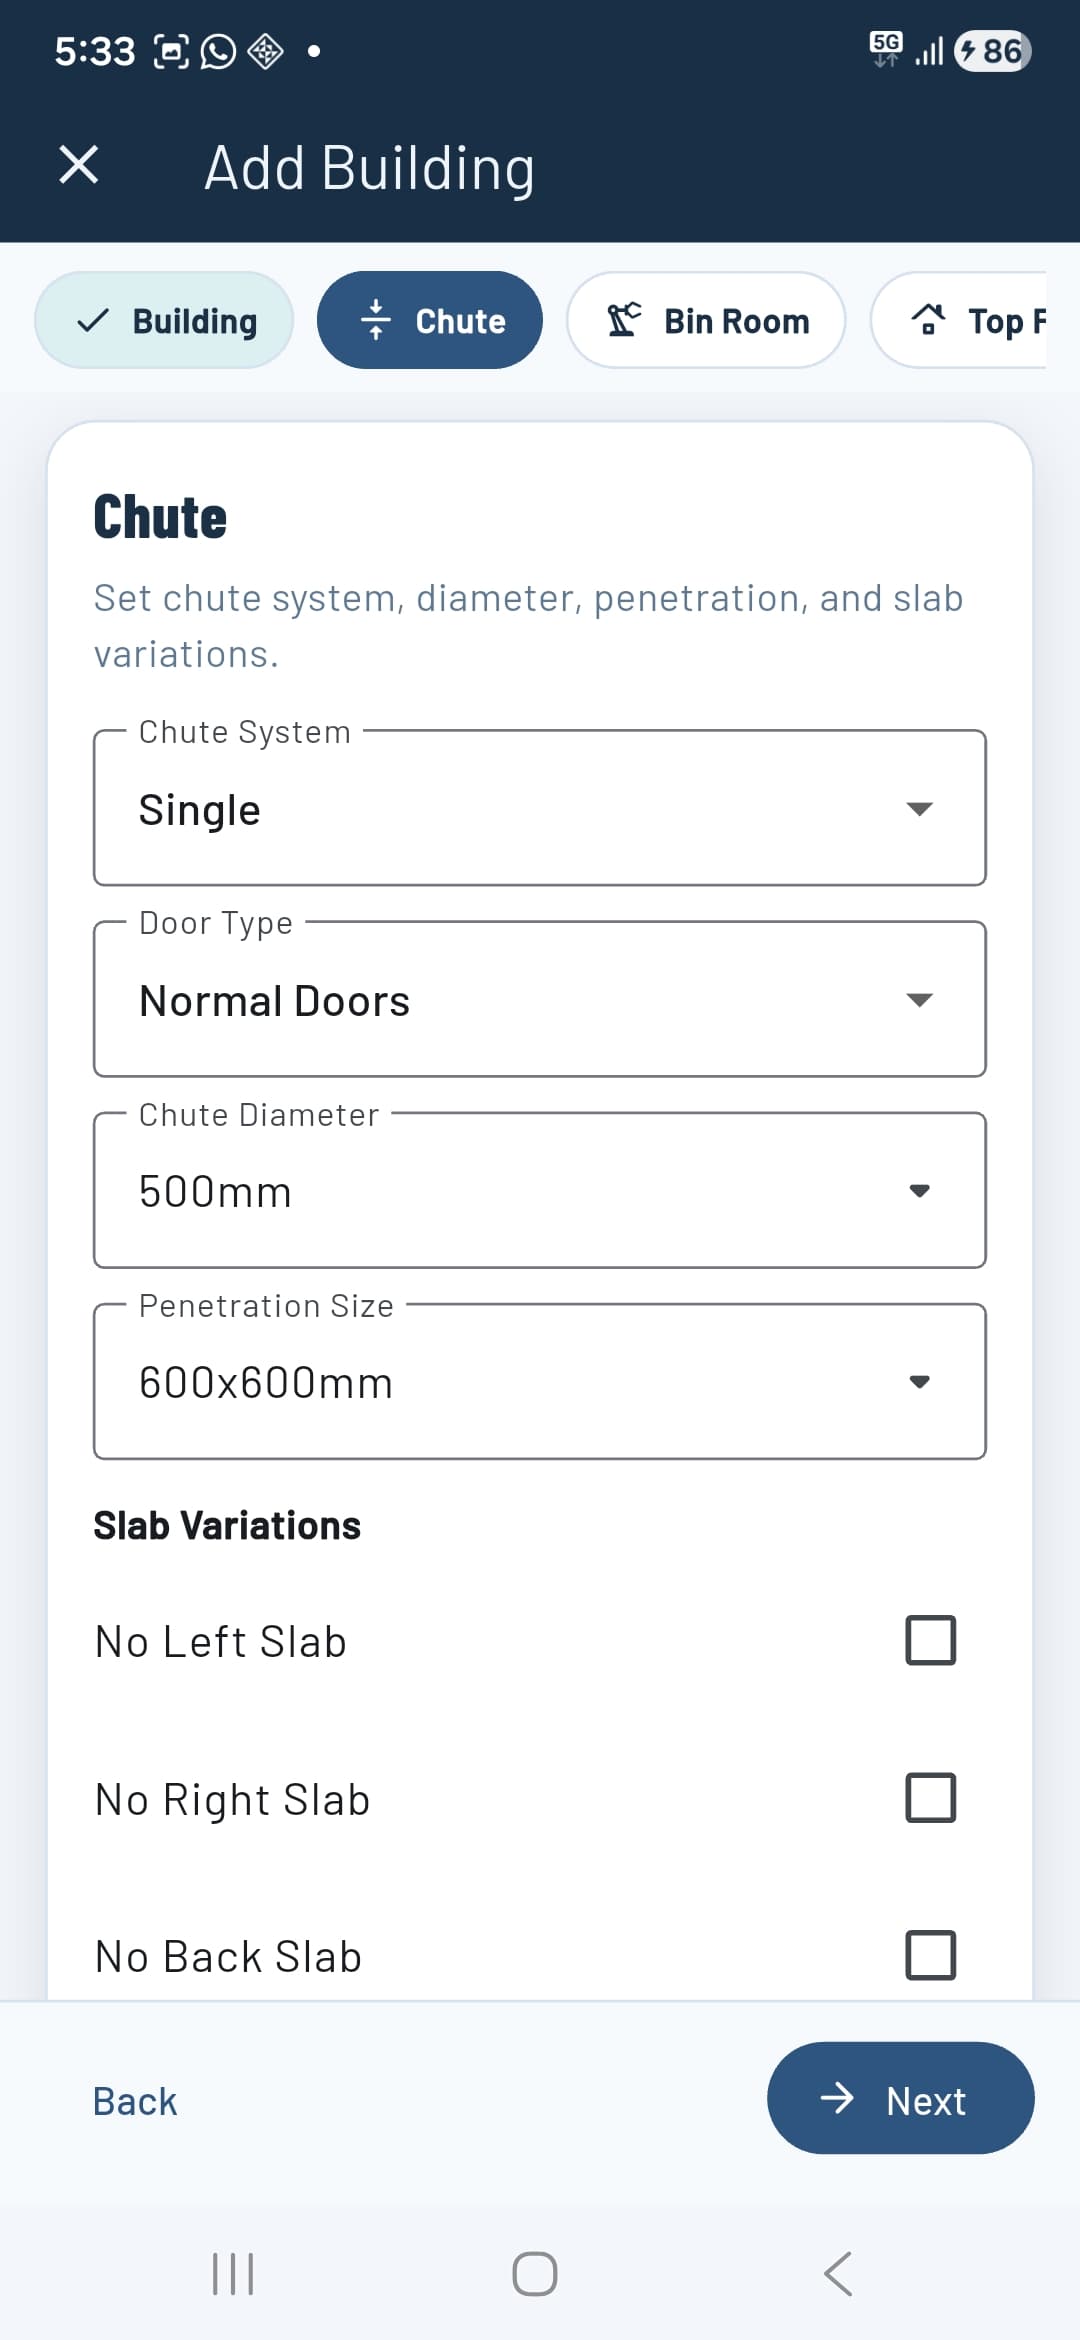
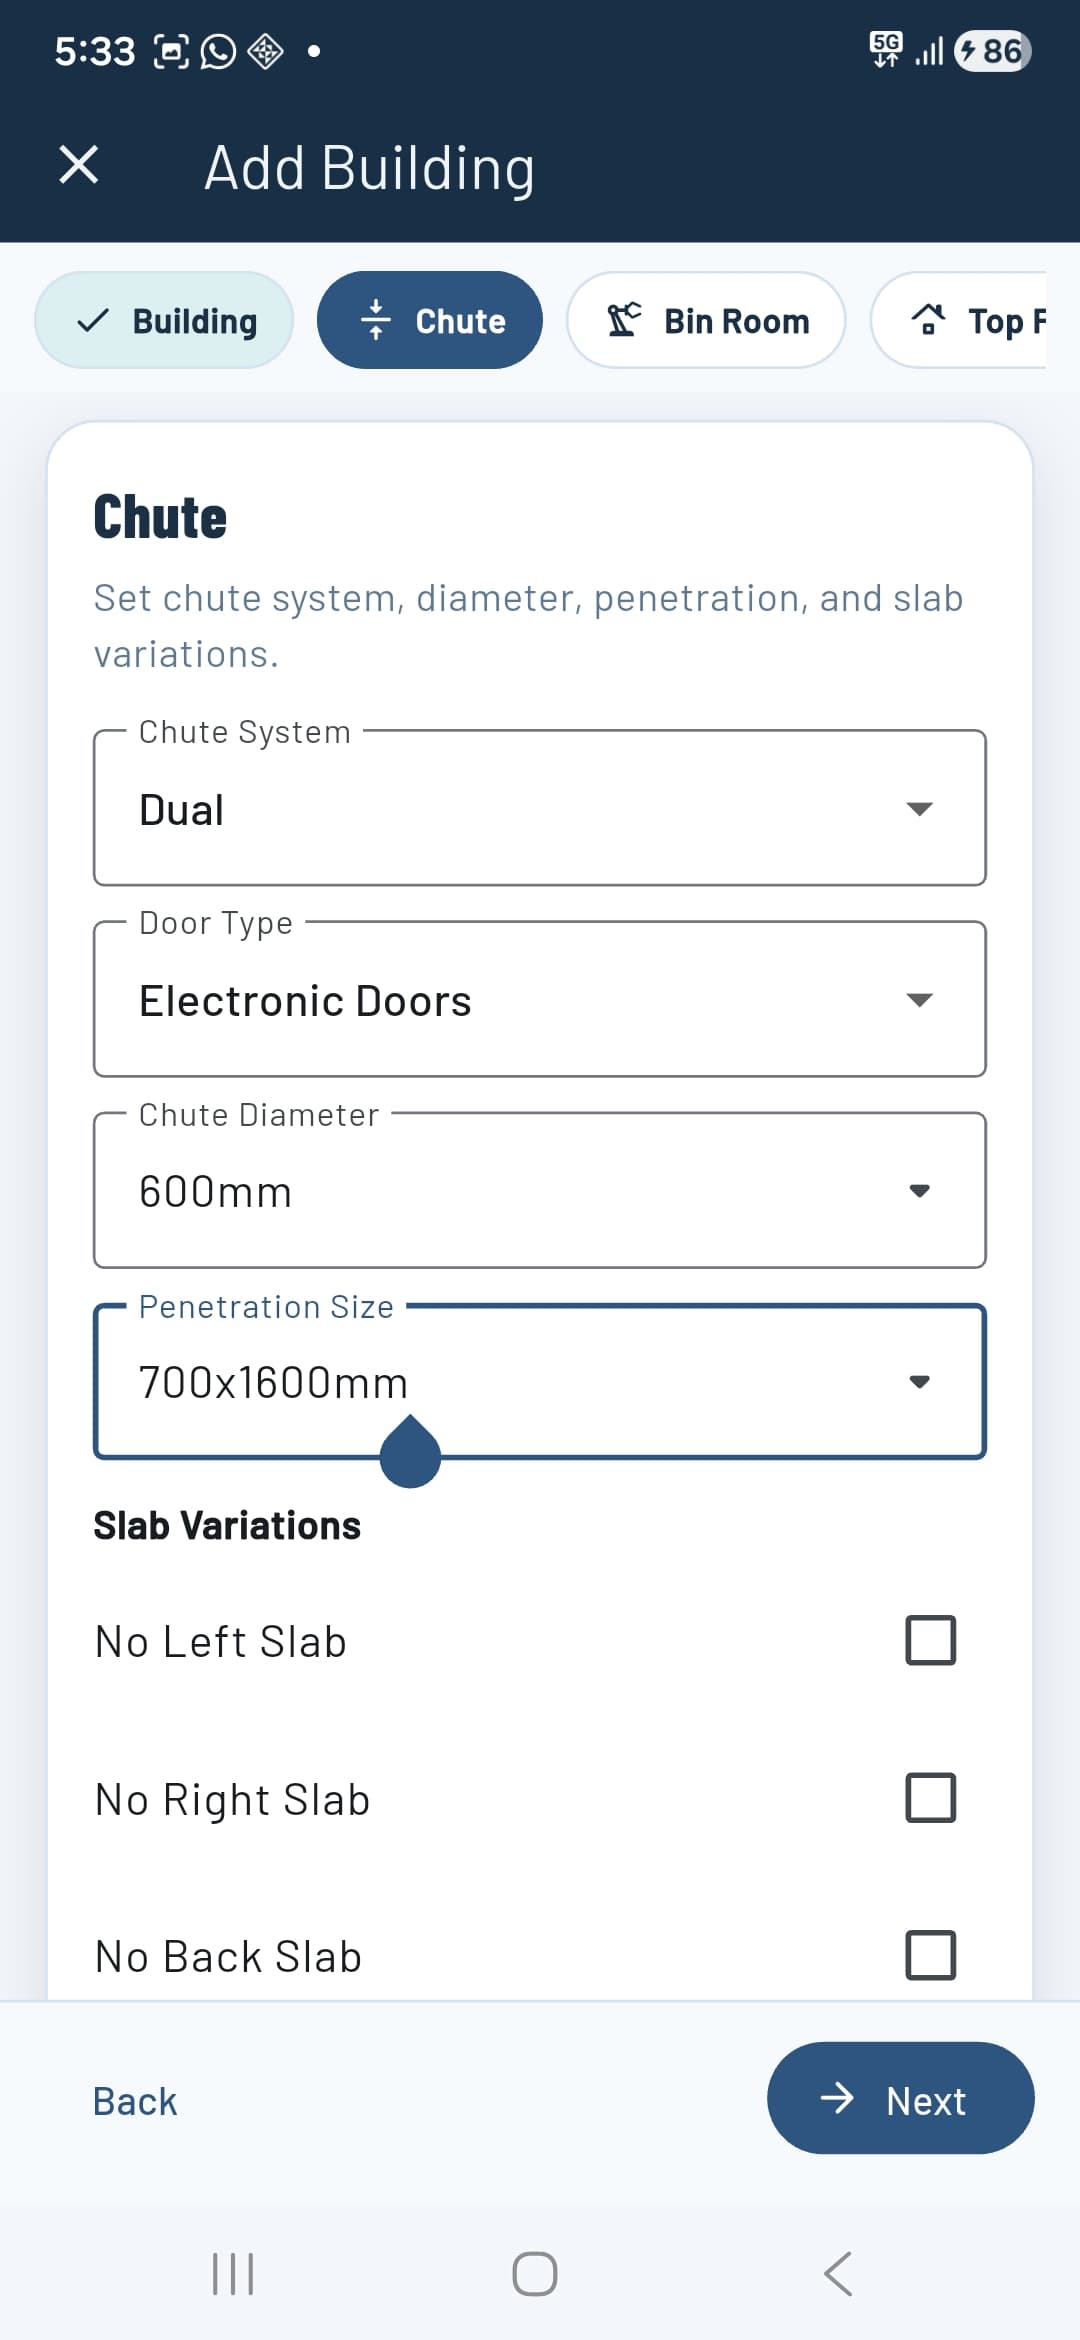
2 — Chute
Set the chute system type (Single or Dual), door type (Normal or Electronic), chute diameter, and penetration size. Check any slab variations that apply — No Left Slab, No Right Slab, or No Back Slab. These settings drive the floor checklist that gets generated.
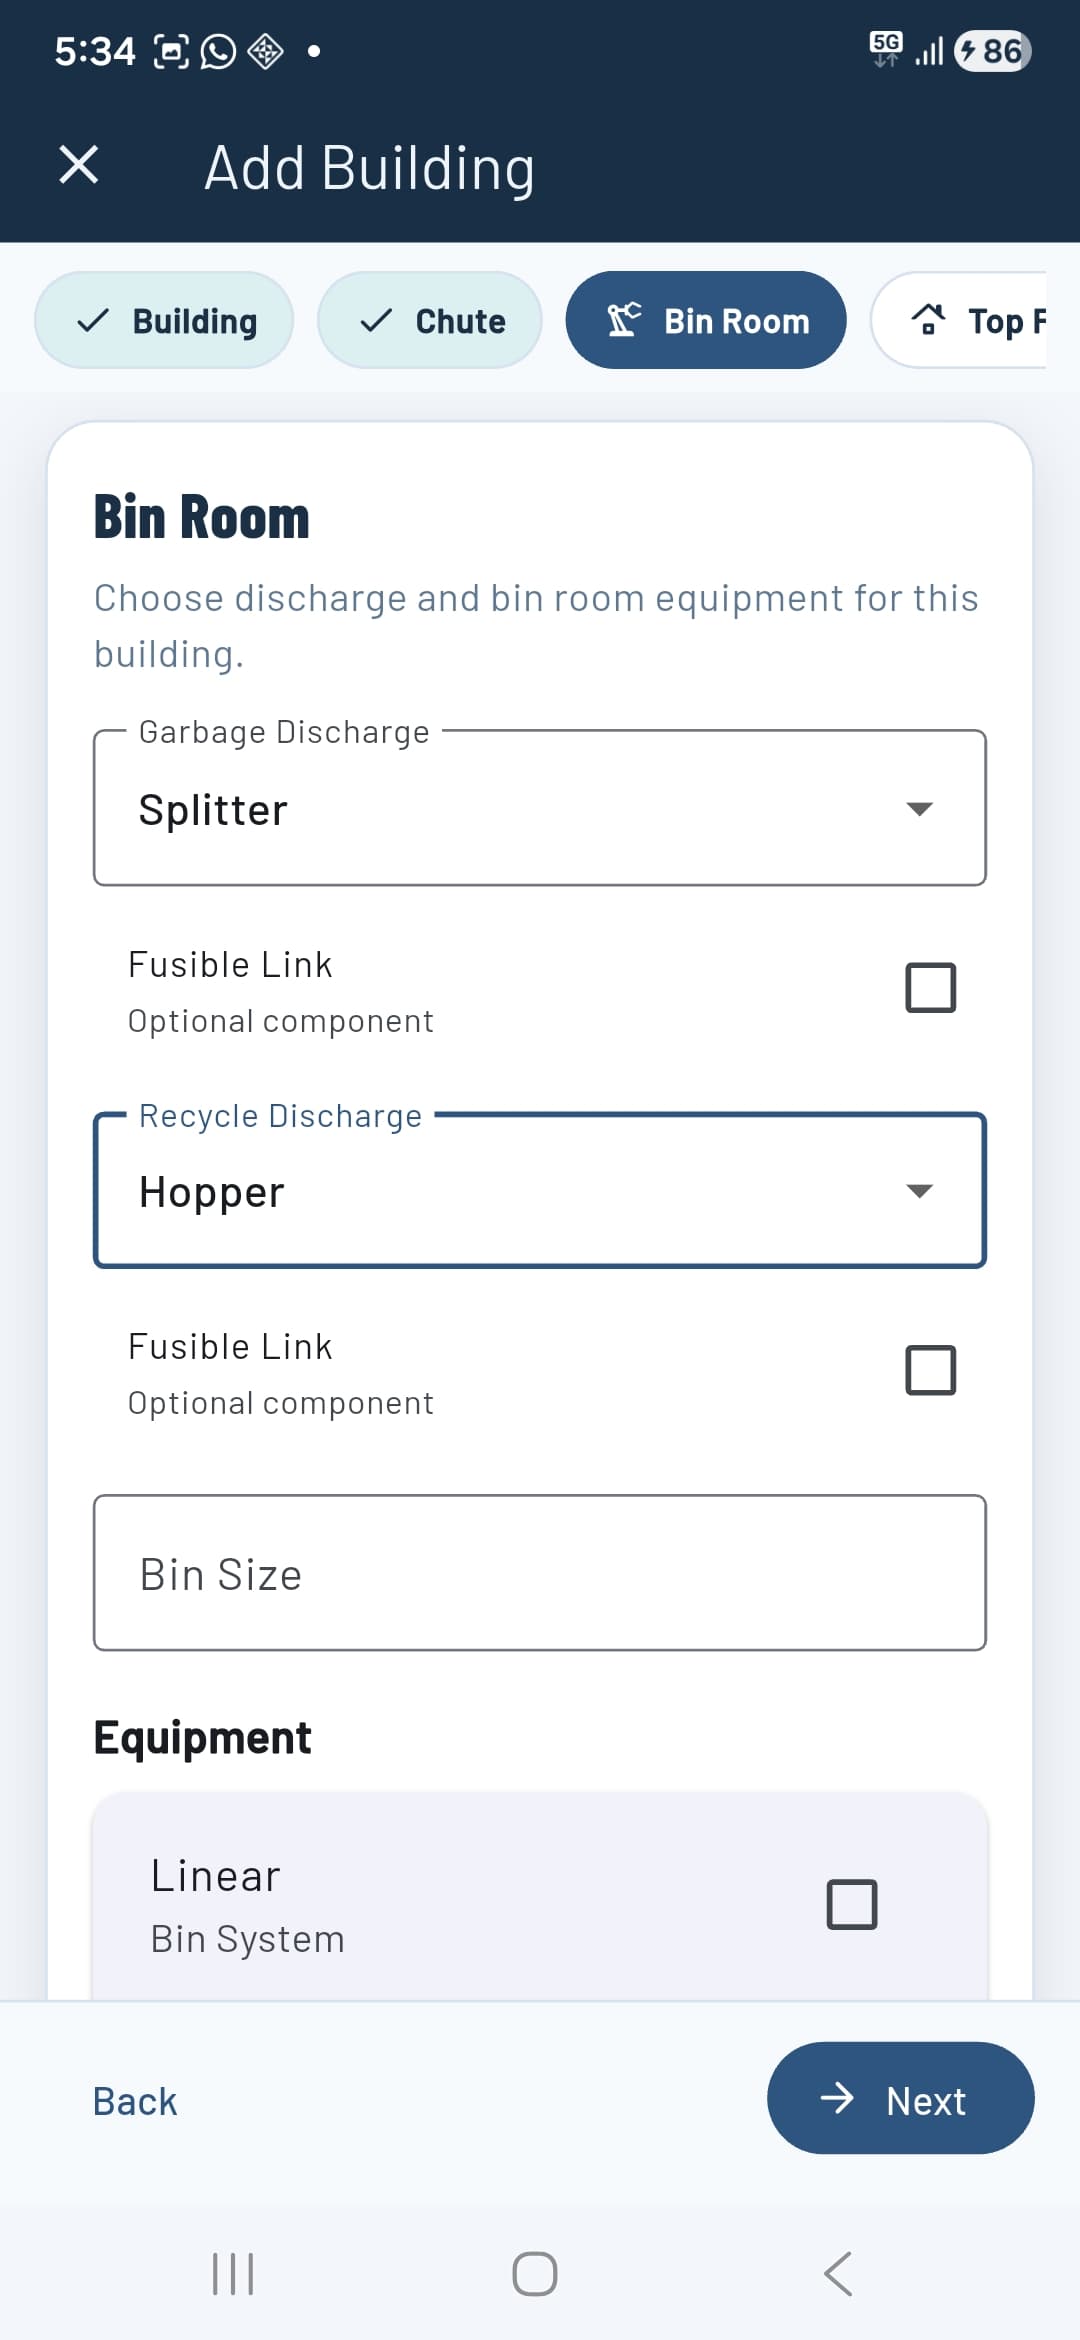
3 — Bin Room
Choose the garbage and recycle discharge types (Splitter, Hopper, A-Type, etc.) and tick Fusible Link if applicable. Add a bin size and select any bin room equipment (Linear Bin System, carousel, compactor). These selections generate the bin room progression checklists automatically.
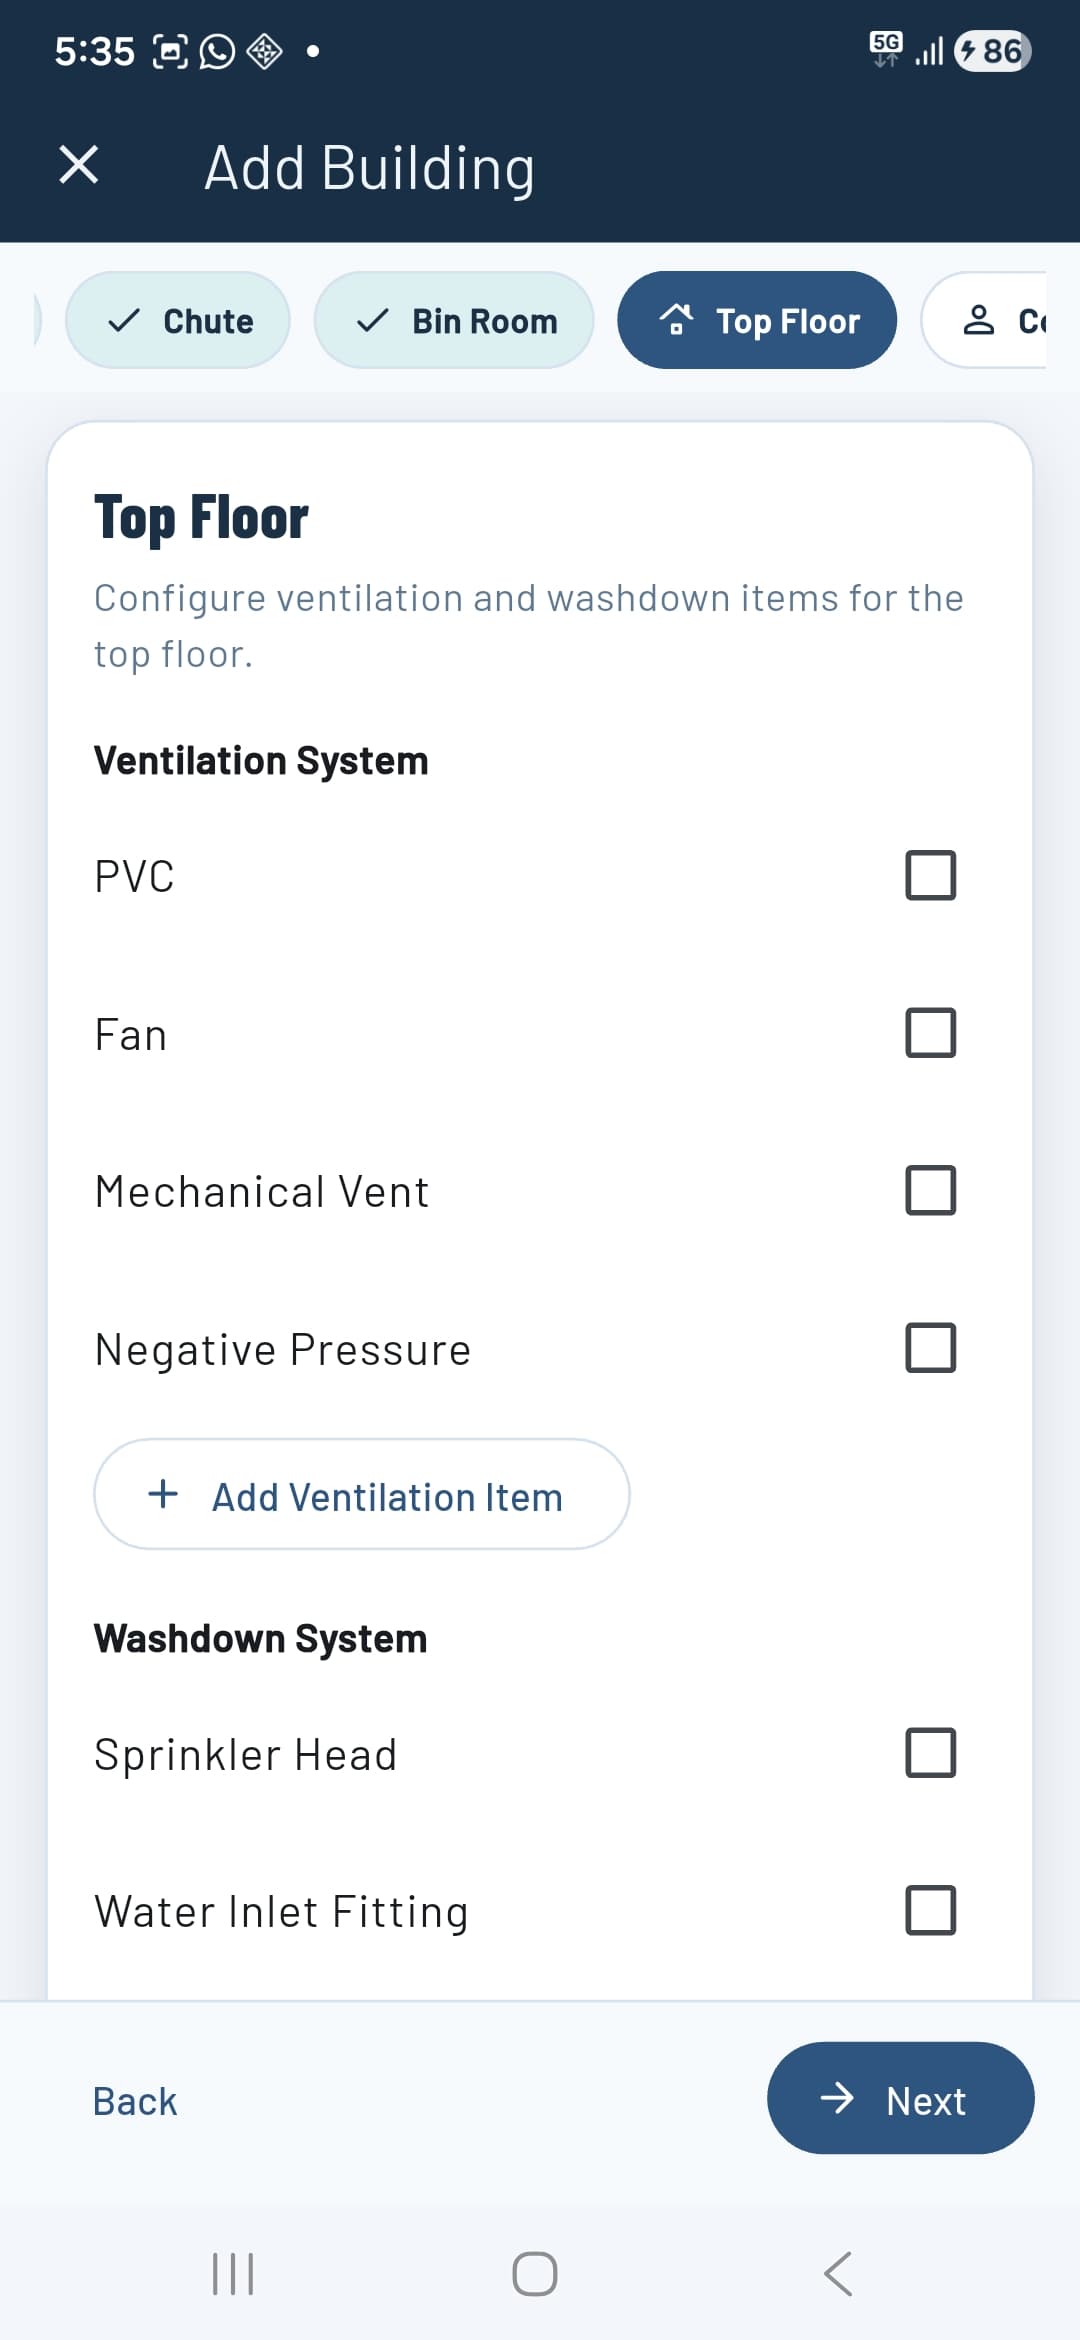
4 — Top Floor
Tick the ventilation components present at the top floor — PVC, Fan, Mechanical Vent, Negative Pressure — and any washdown components (Sprinkler Head, Water Inlet Fitting, Shutoff Valve, Solenoid Valve). Use + Add Ventilation Item or + Add Washdown Item to add custom items not in the list.
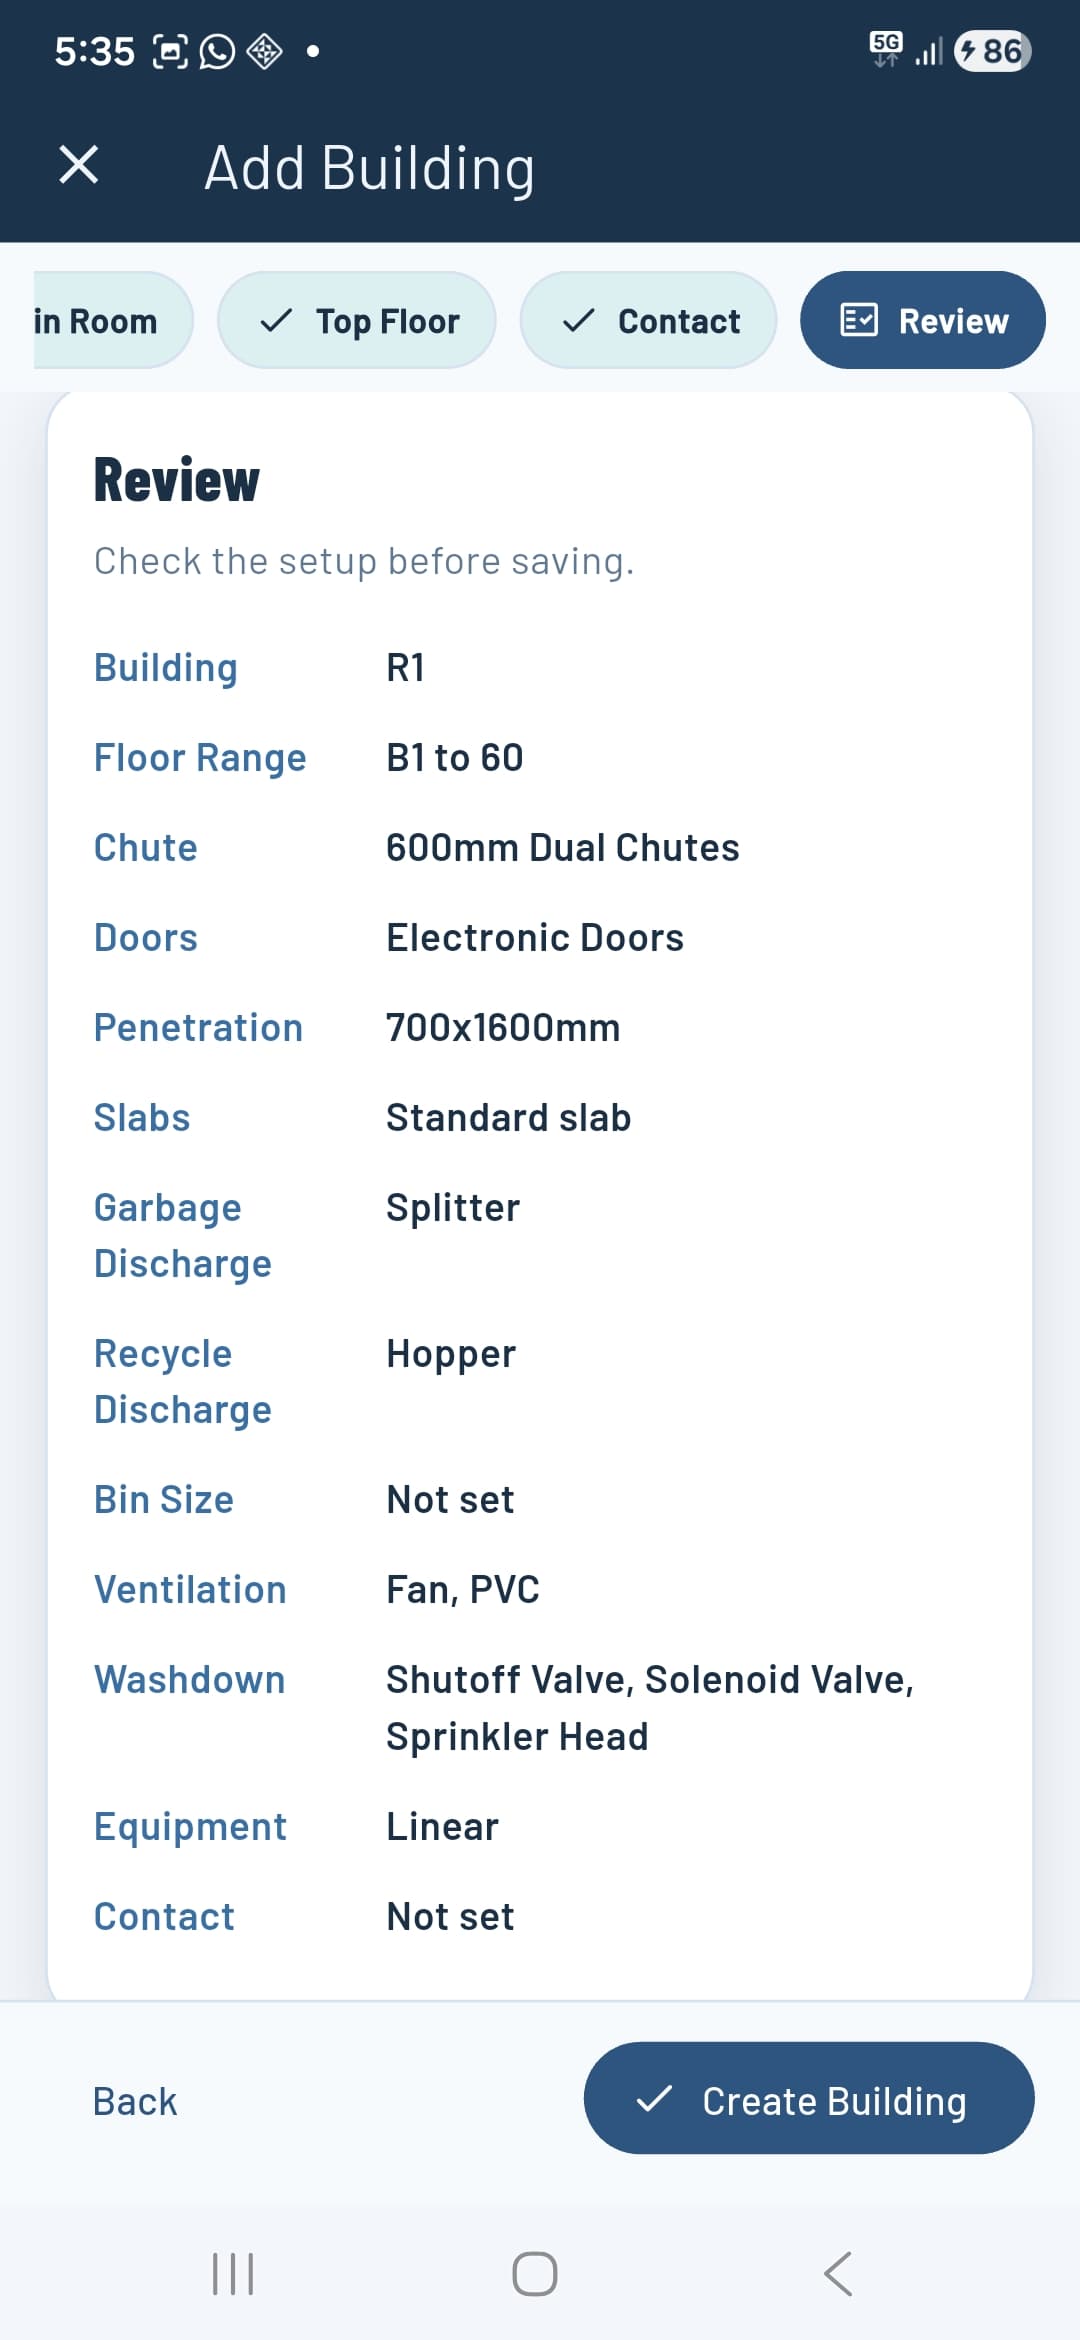
5 — Review & Create
The Review tab summarises everything before you commit. Check all details, then tap Create Building. The building appears immediately in the project with a 0% progress ring.
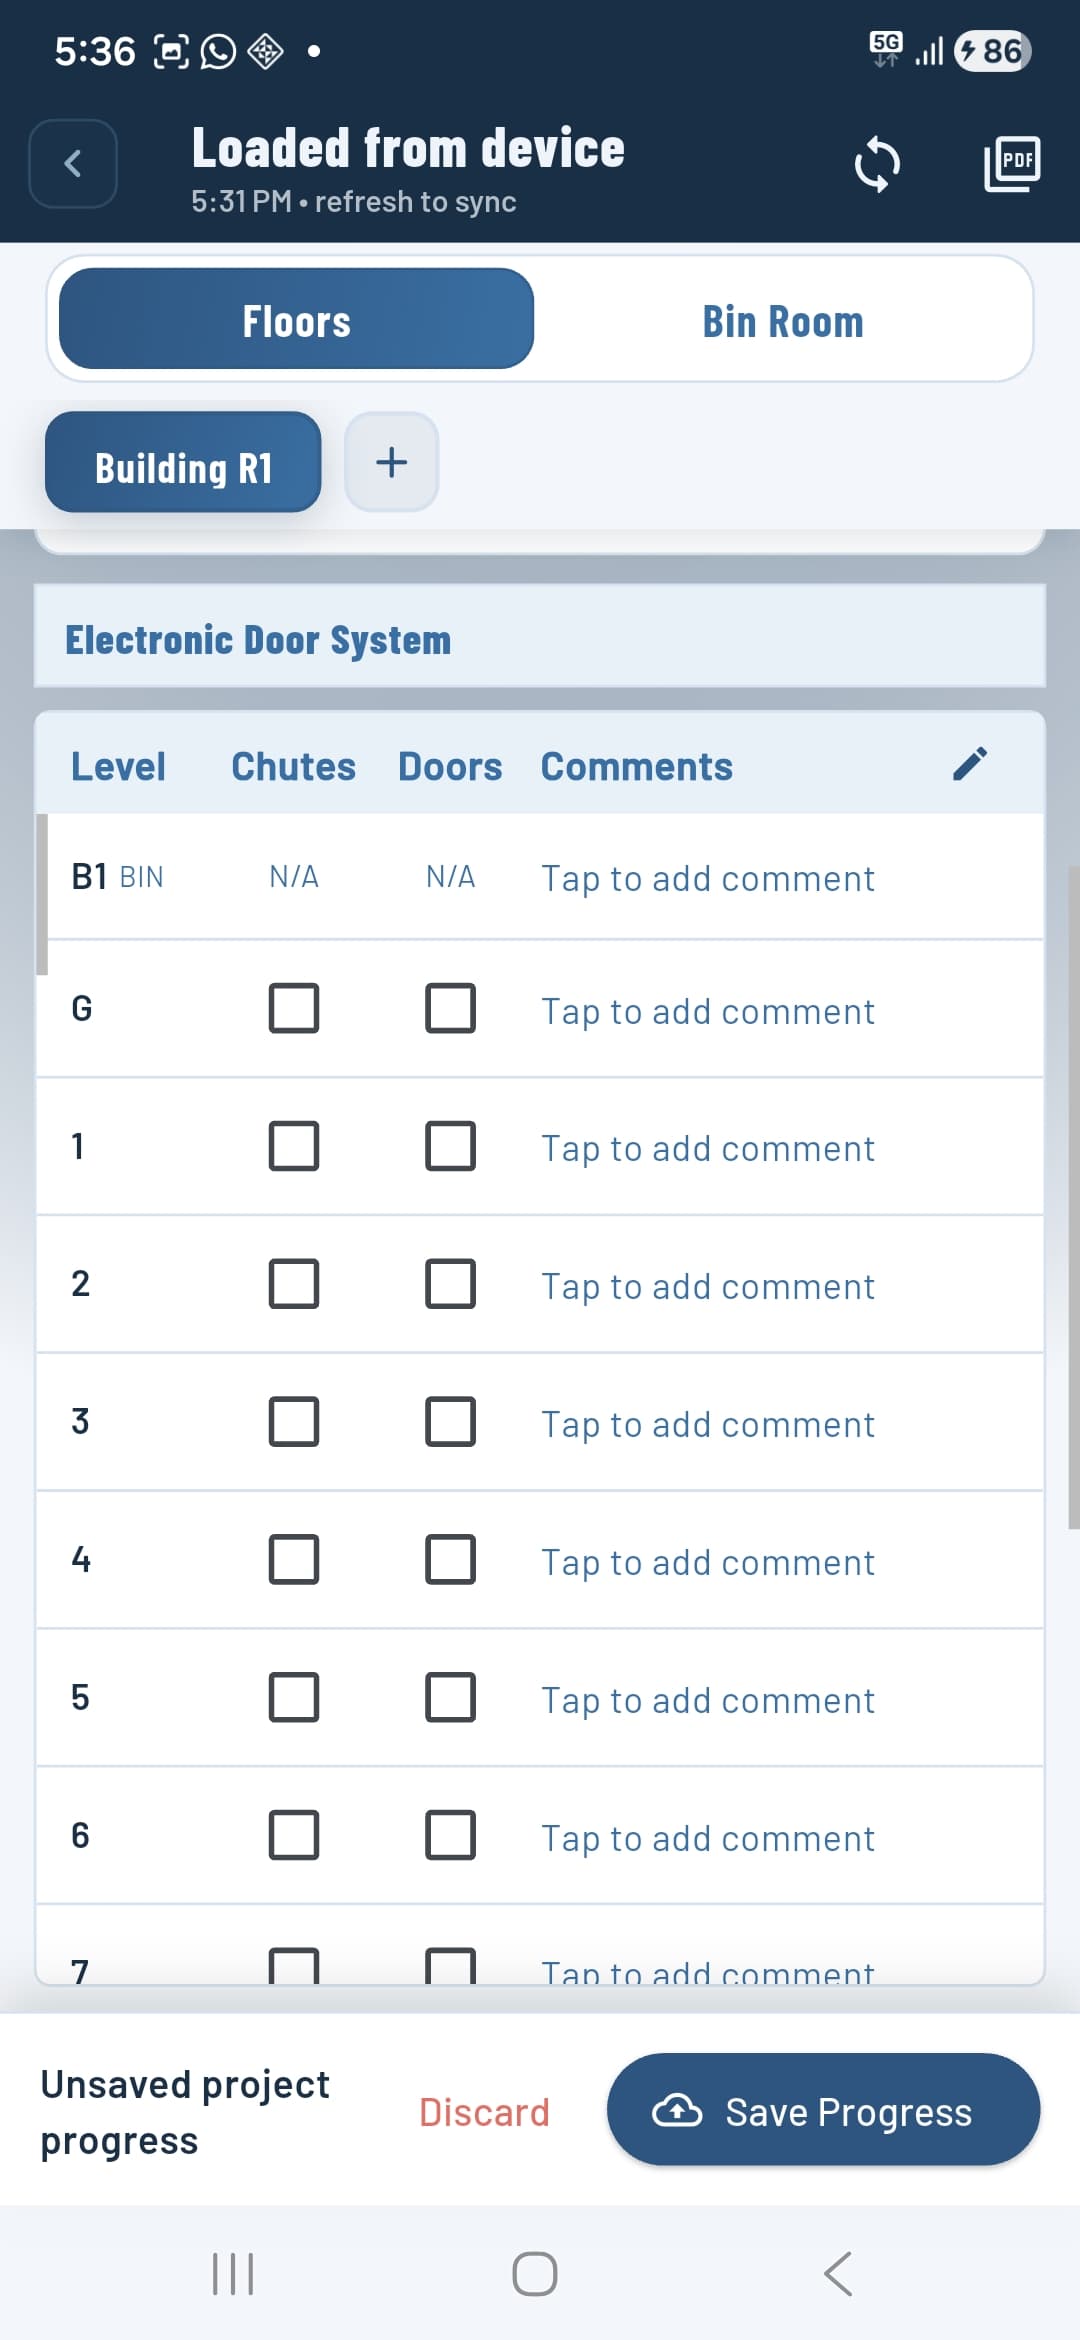
Floor tracking
Inside a project, open the Floors tab and select a building. The Electronic Door System table lists every level from the bin room up to the top floor, with a Chutes column and a Doors column.
Tick a checkbox to mark that component as installed on that floor. Tap Tap to add comment on any row to log notes — useful for defects, offsets, or partial installs. The building progress percentage updates in real time as you check off floors.
Tap Save Progress at the bottom of the screen to sync your changes to the cloud. The header shows the last save time and a sync button to pull the latest data from other team members.
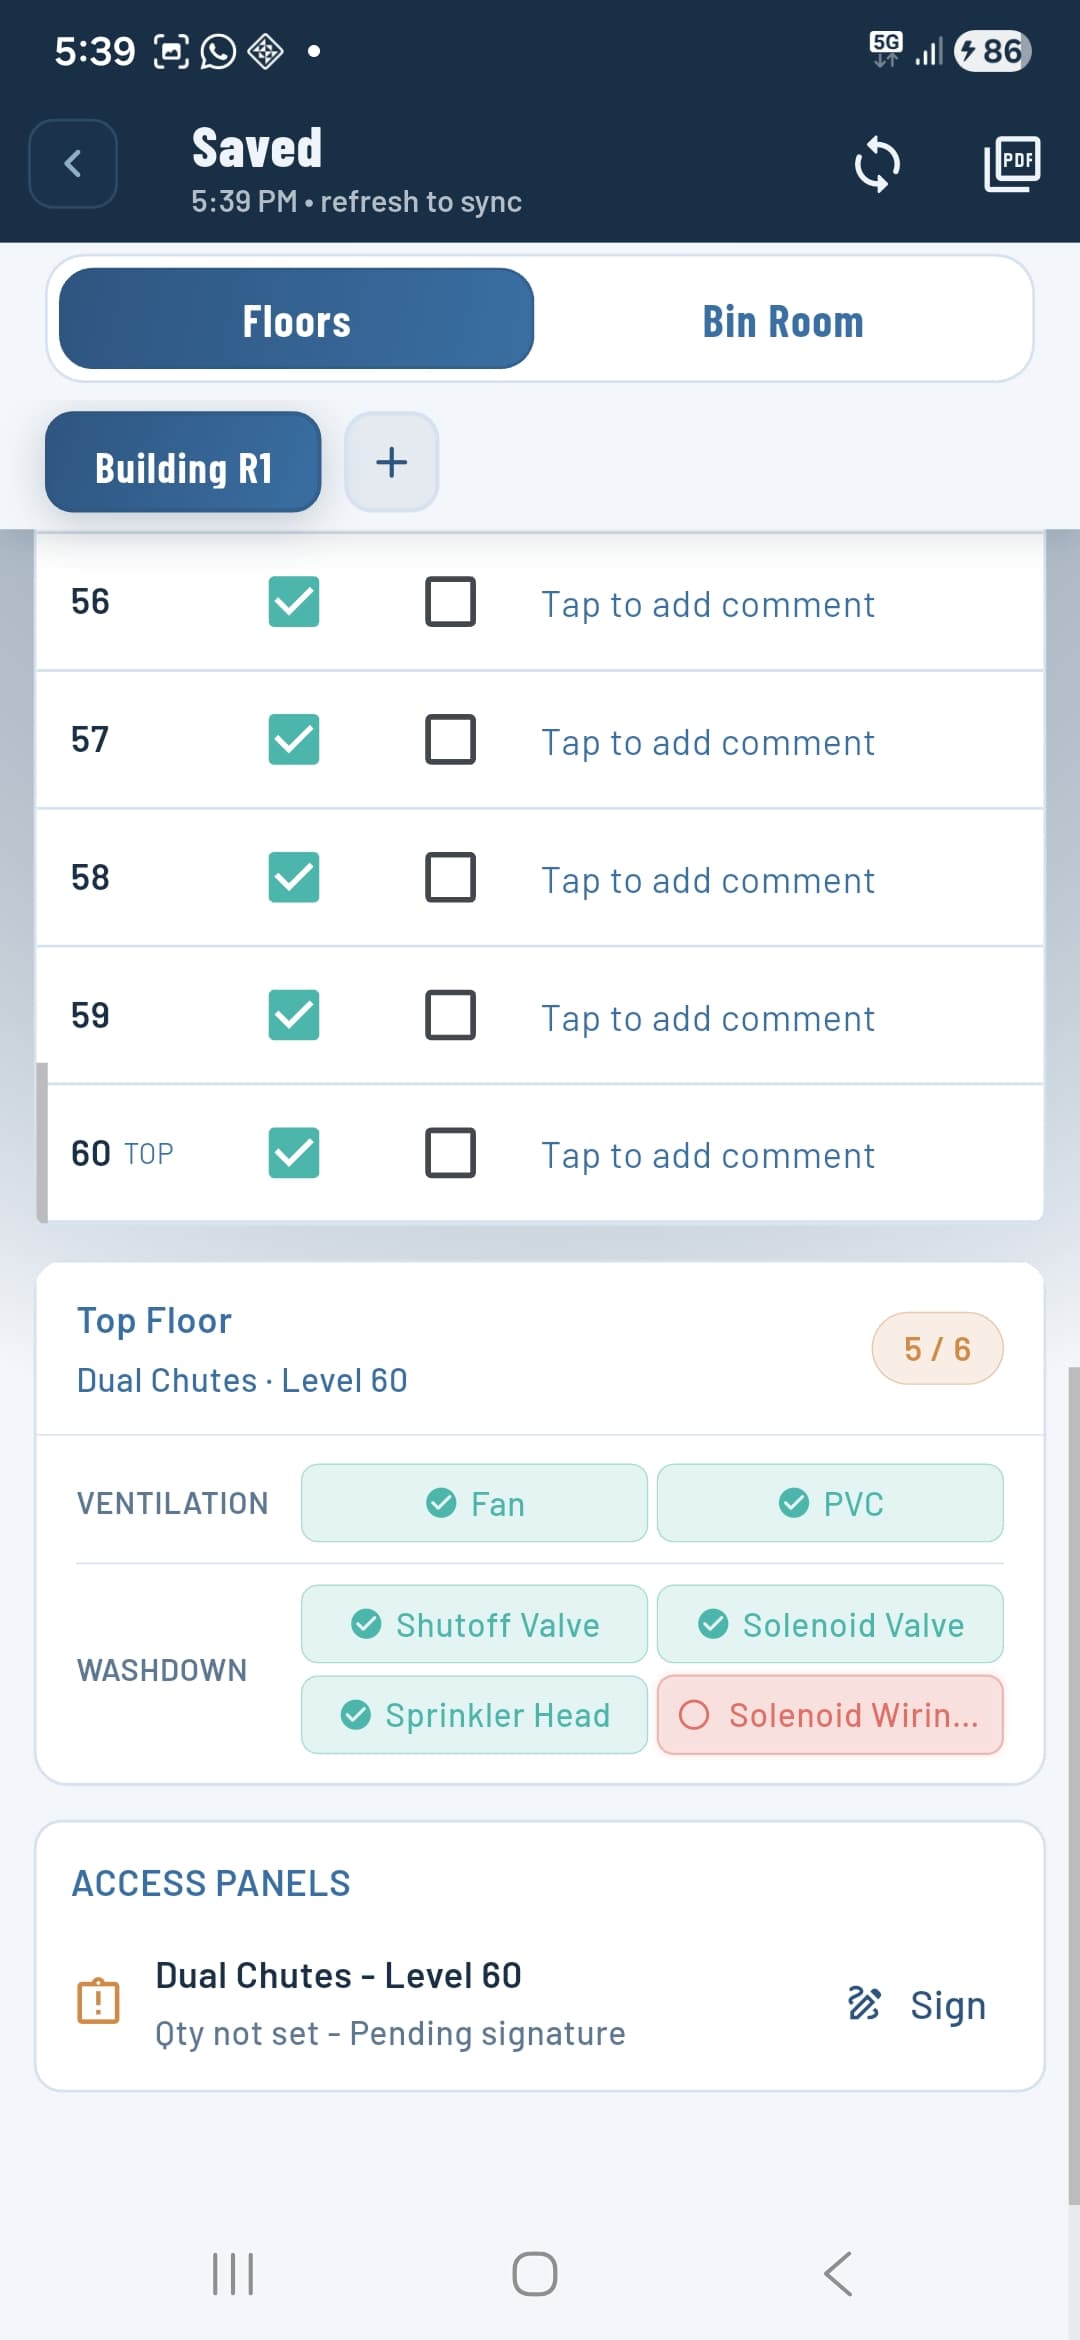
Top floor checklist
Below the floor table, the Top Floor card shows the ventilation and washdown items you configured when setting up the building. Each item appears as a pill — tap to toggle between installed (green tick) and outstanding (red circle).
The counter (e.g. 5 / 6) shows how many top floor items are complete. This count is included in the overall building progress percentage.
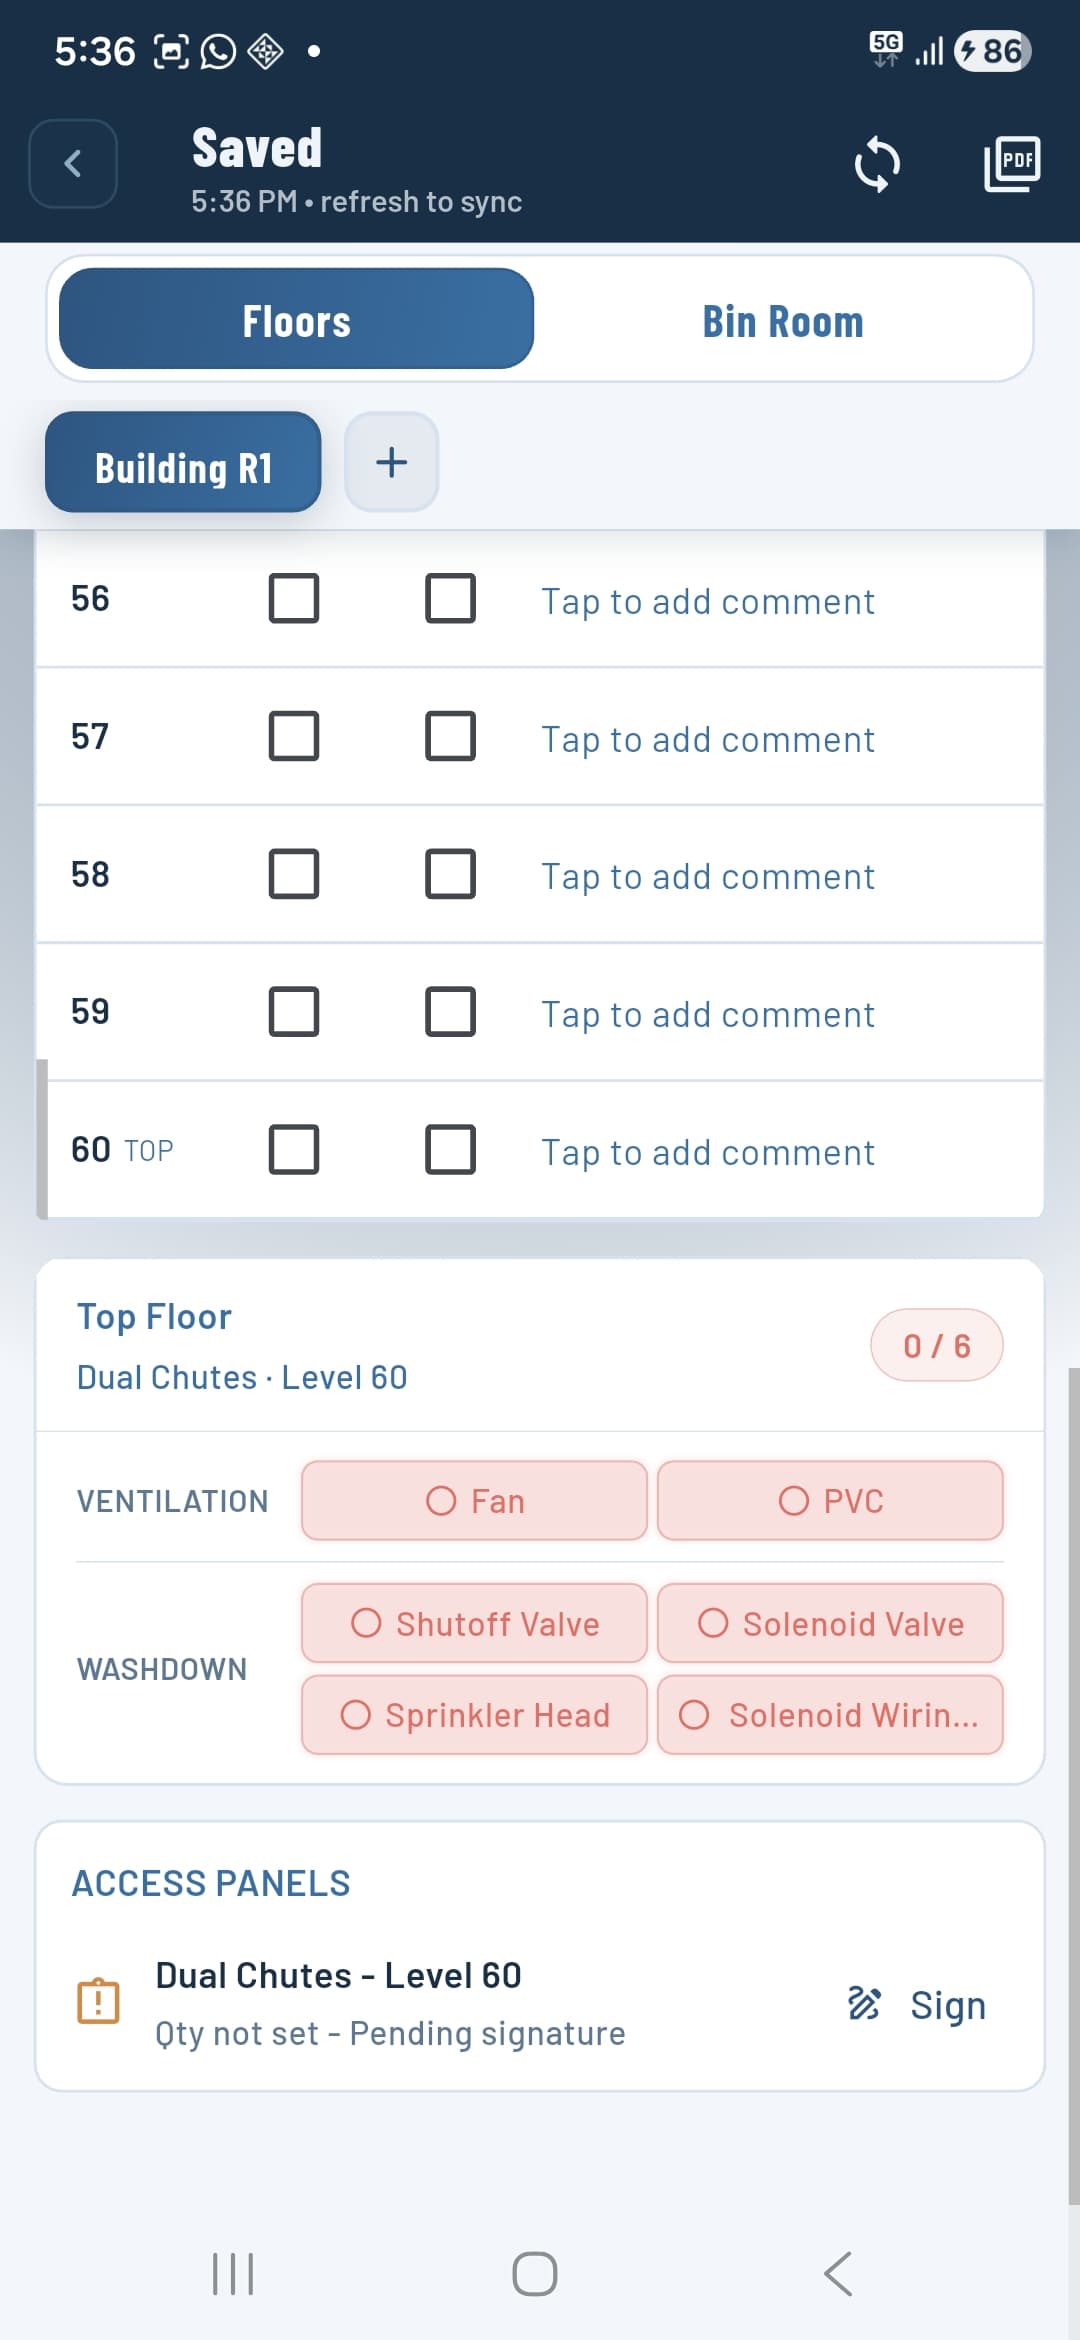
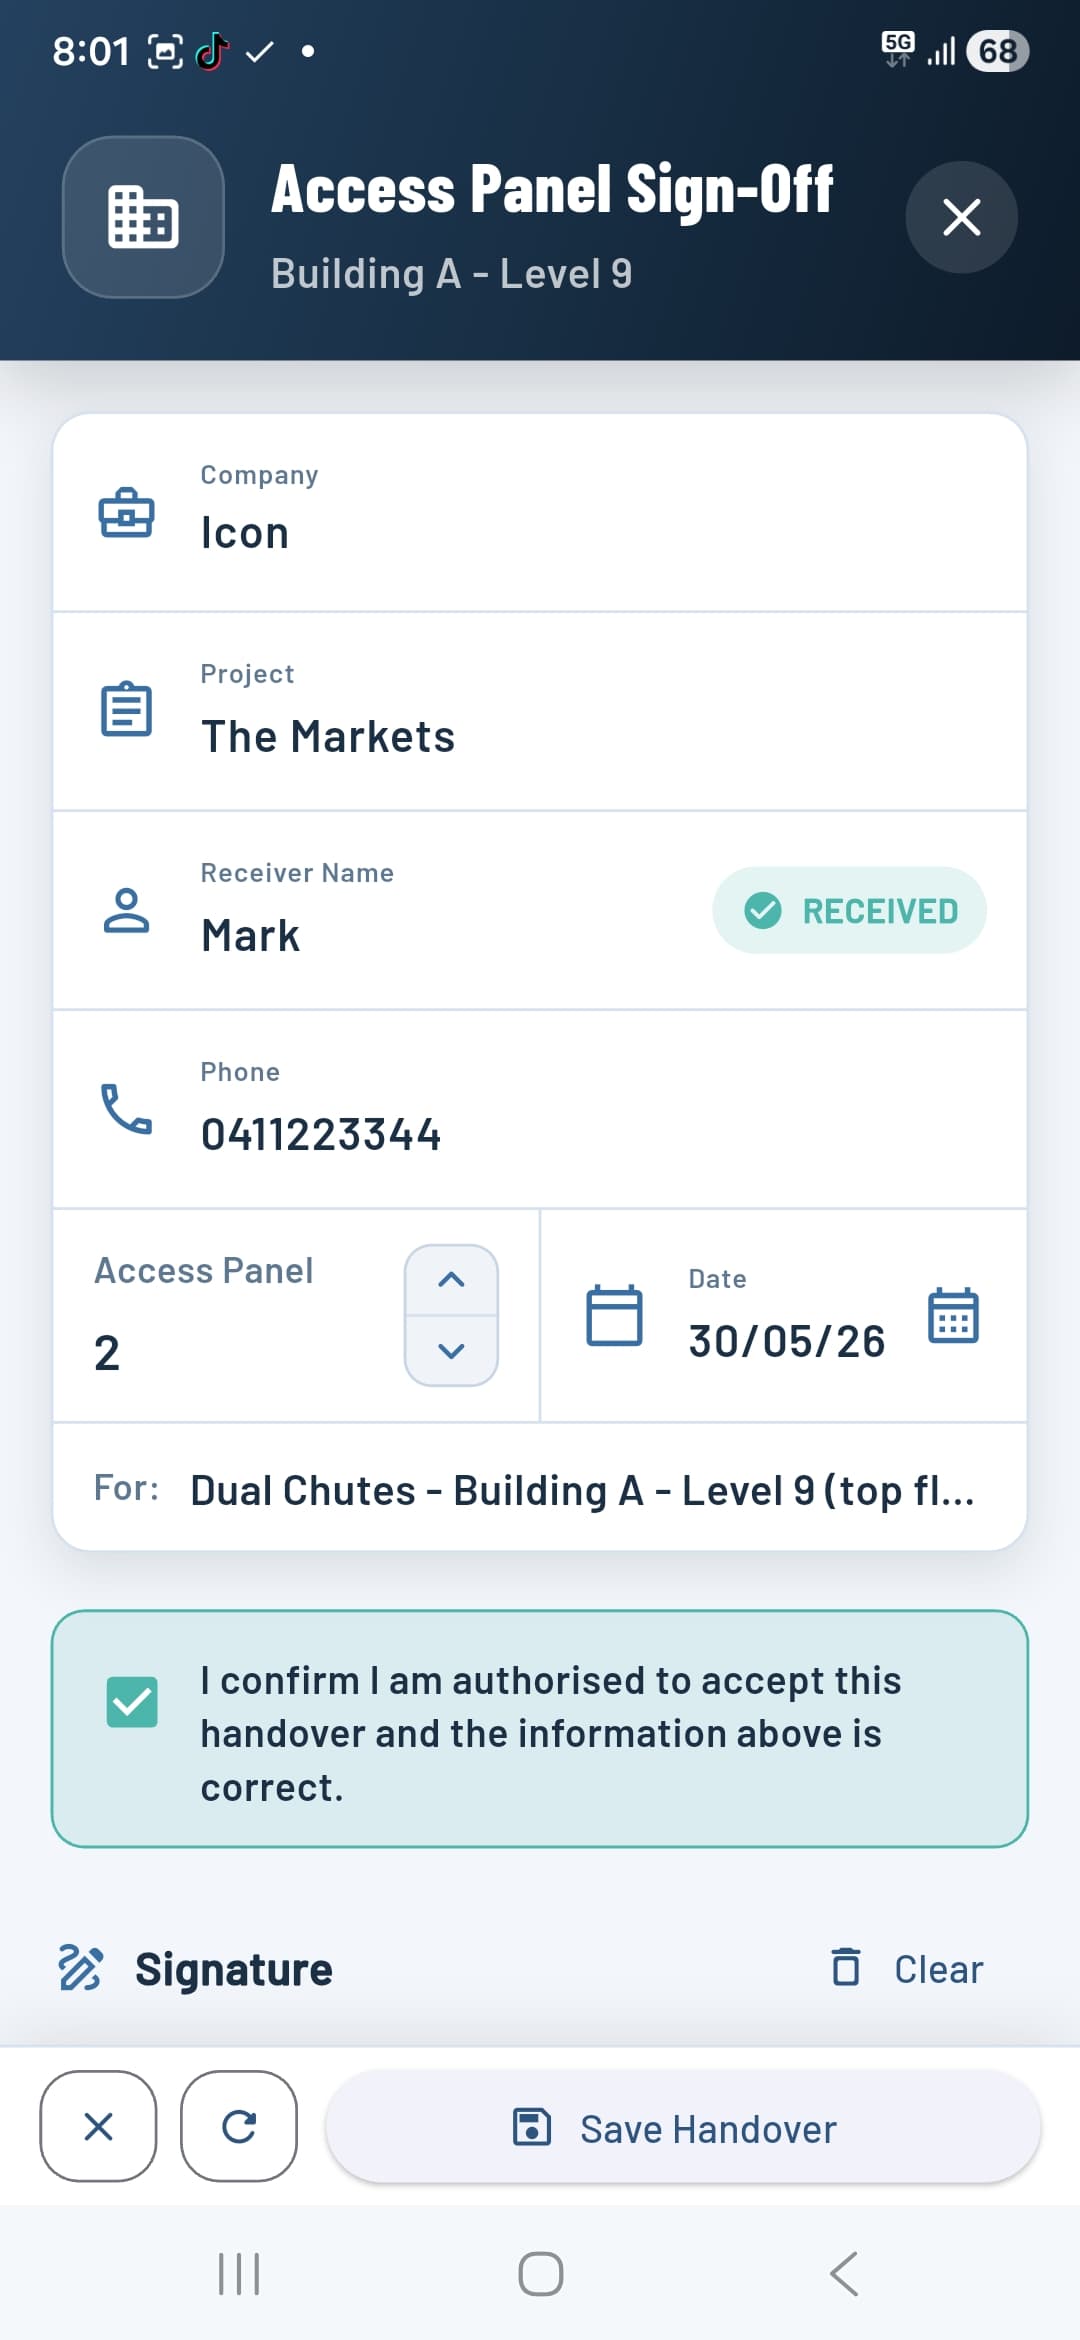
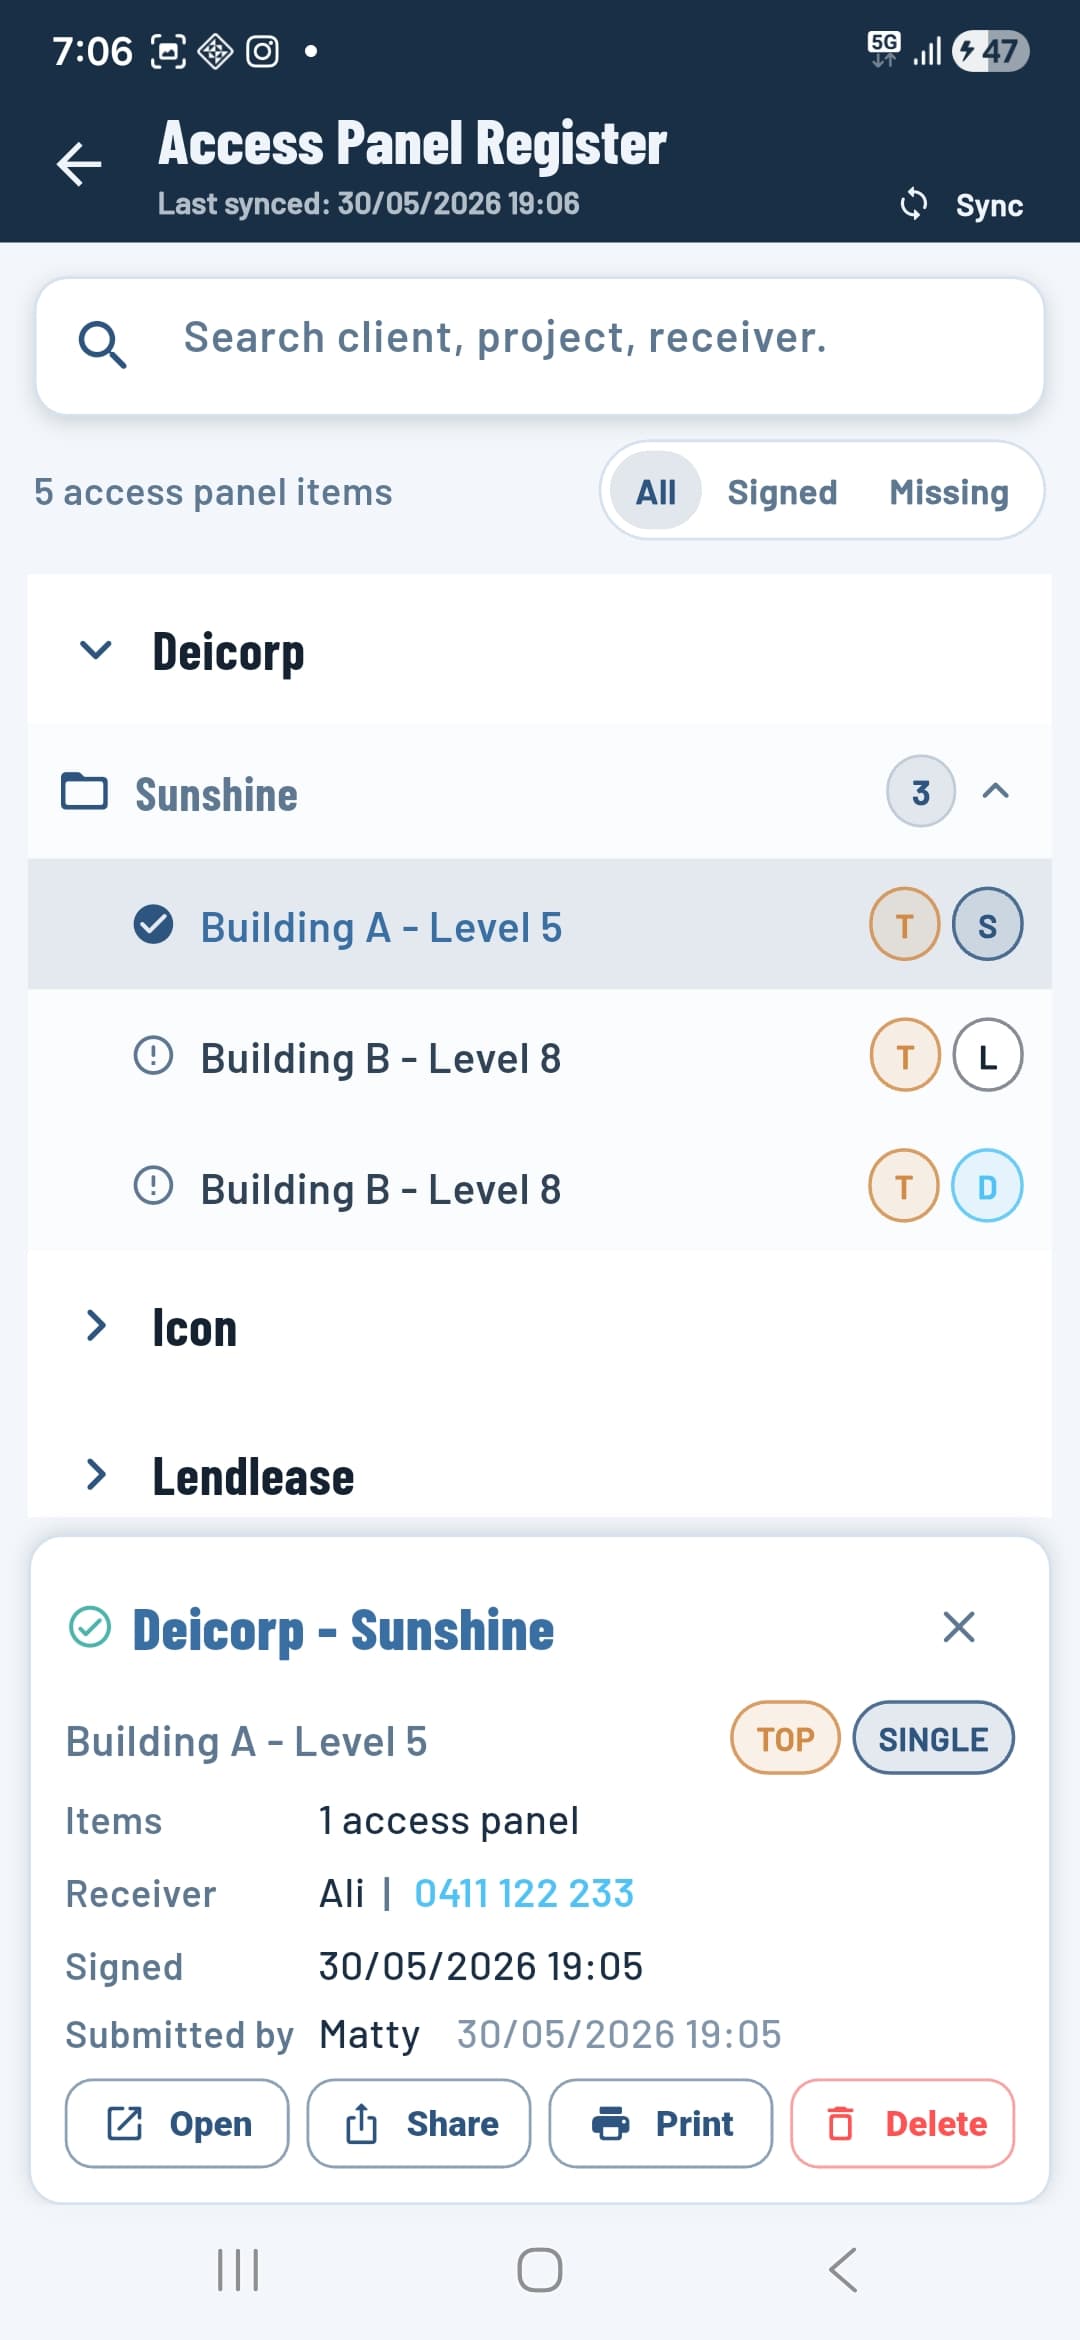
Access panel sign-off
Below the Top Floor card in the floor view, the Access Panels section lists any unsigned handover records for that building. Tap Sign next to a record to open the sign-off form.
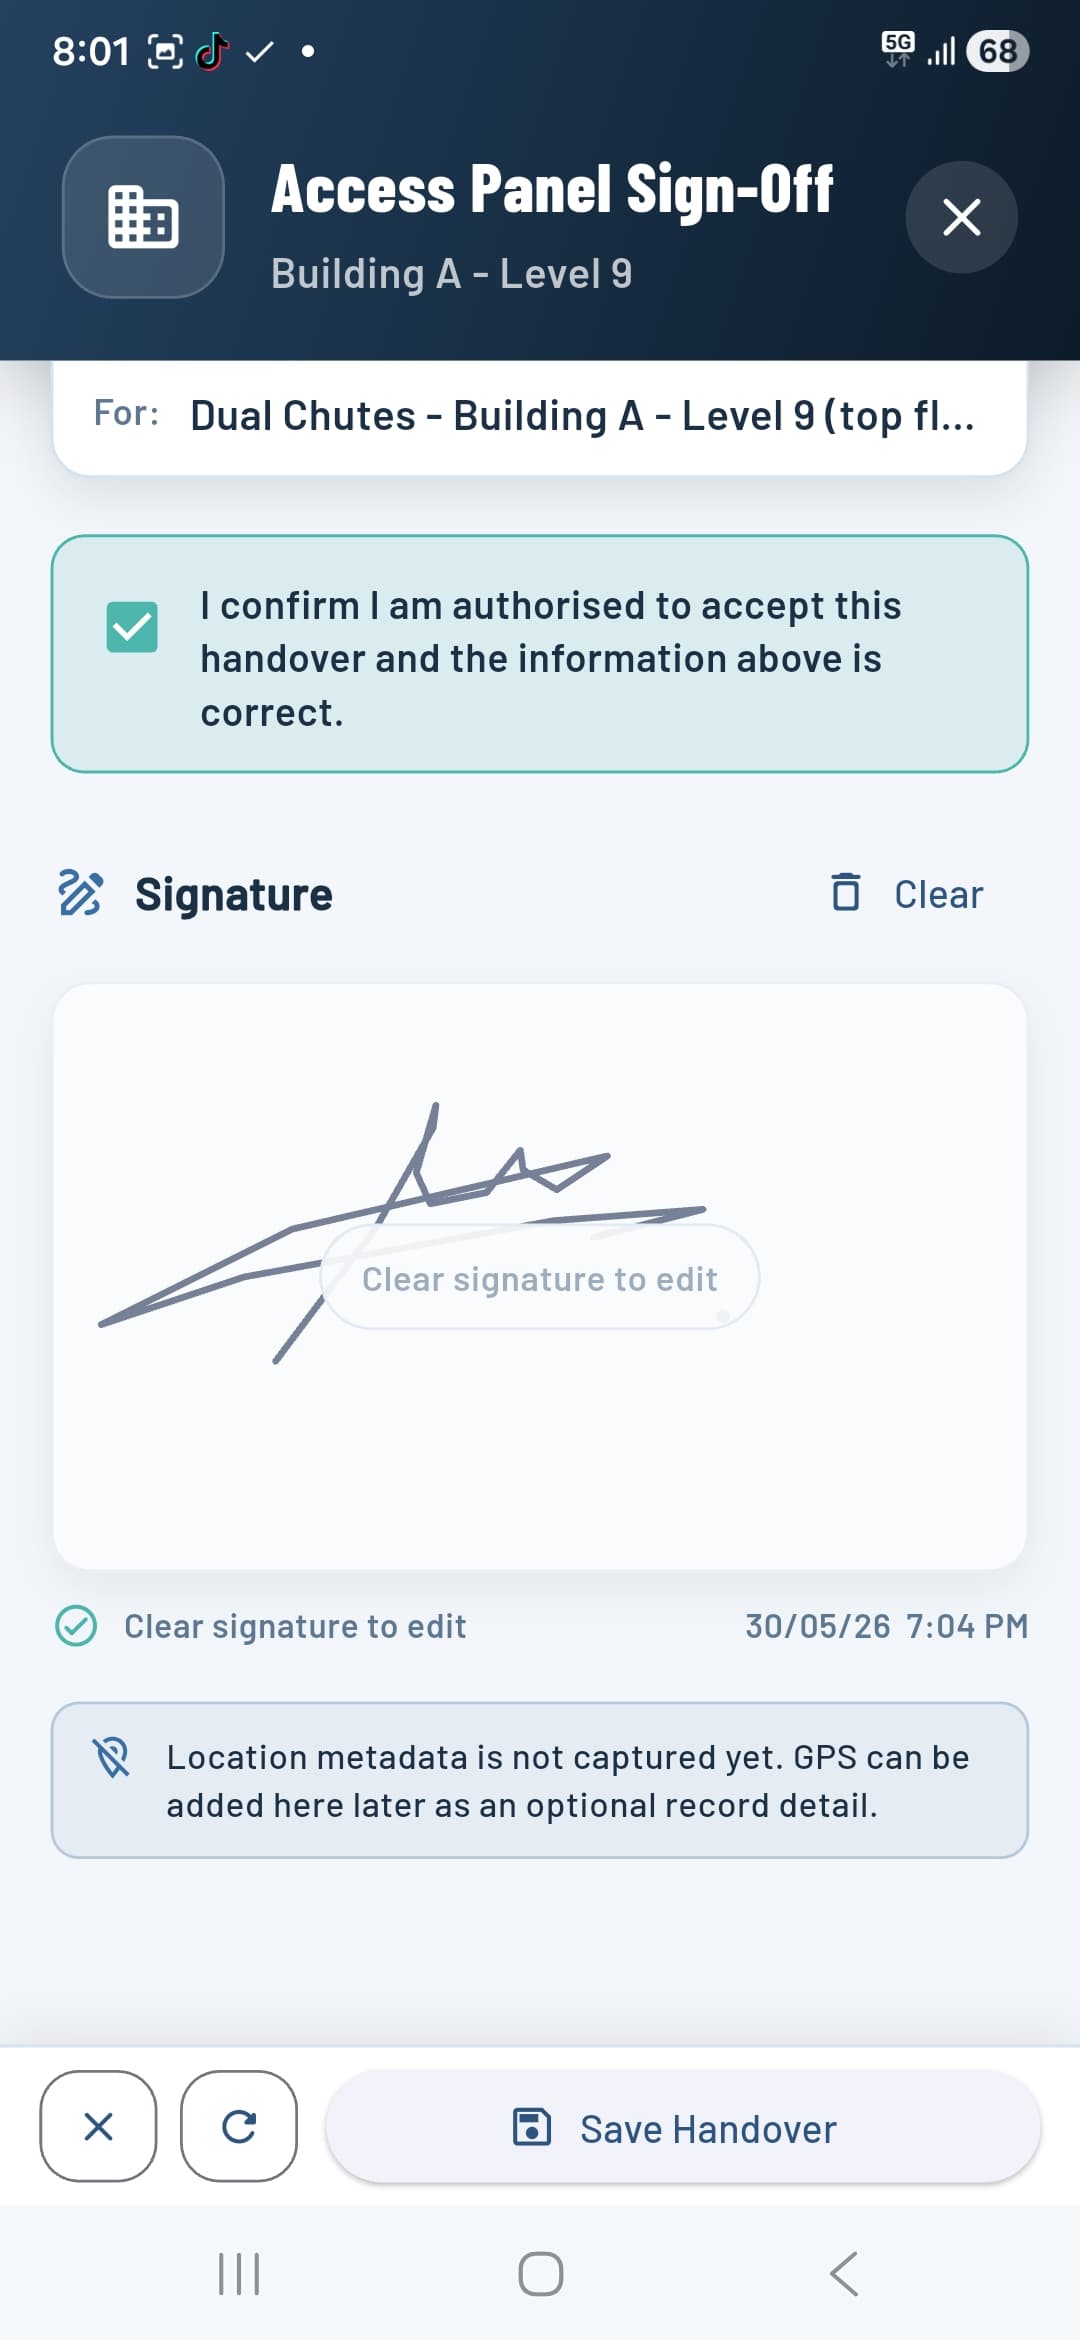
Fill in the receiver's details, set the quantity of access panels being handed over, confirm the date, and check the authorisation box. Once confirmed, the signature canvas activates — draw the receiver's signature and tap Save Handover.
The signed record is timestamped and submitted under your user account. It immediately appears in the Access Panel Register where it can be shared, printed, or opened as a PDF.
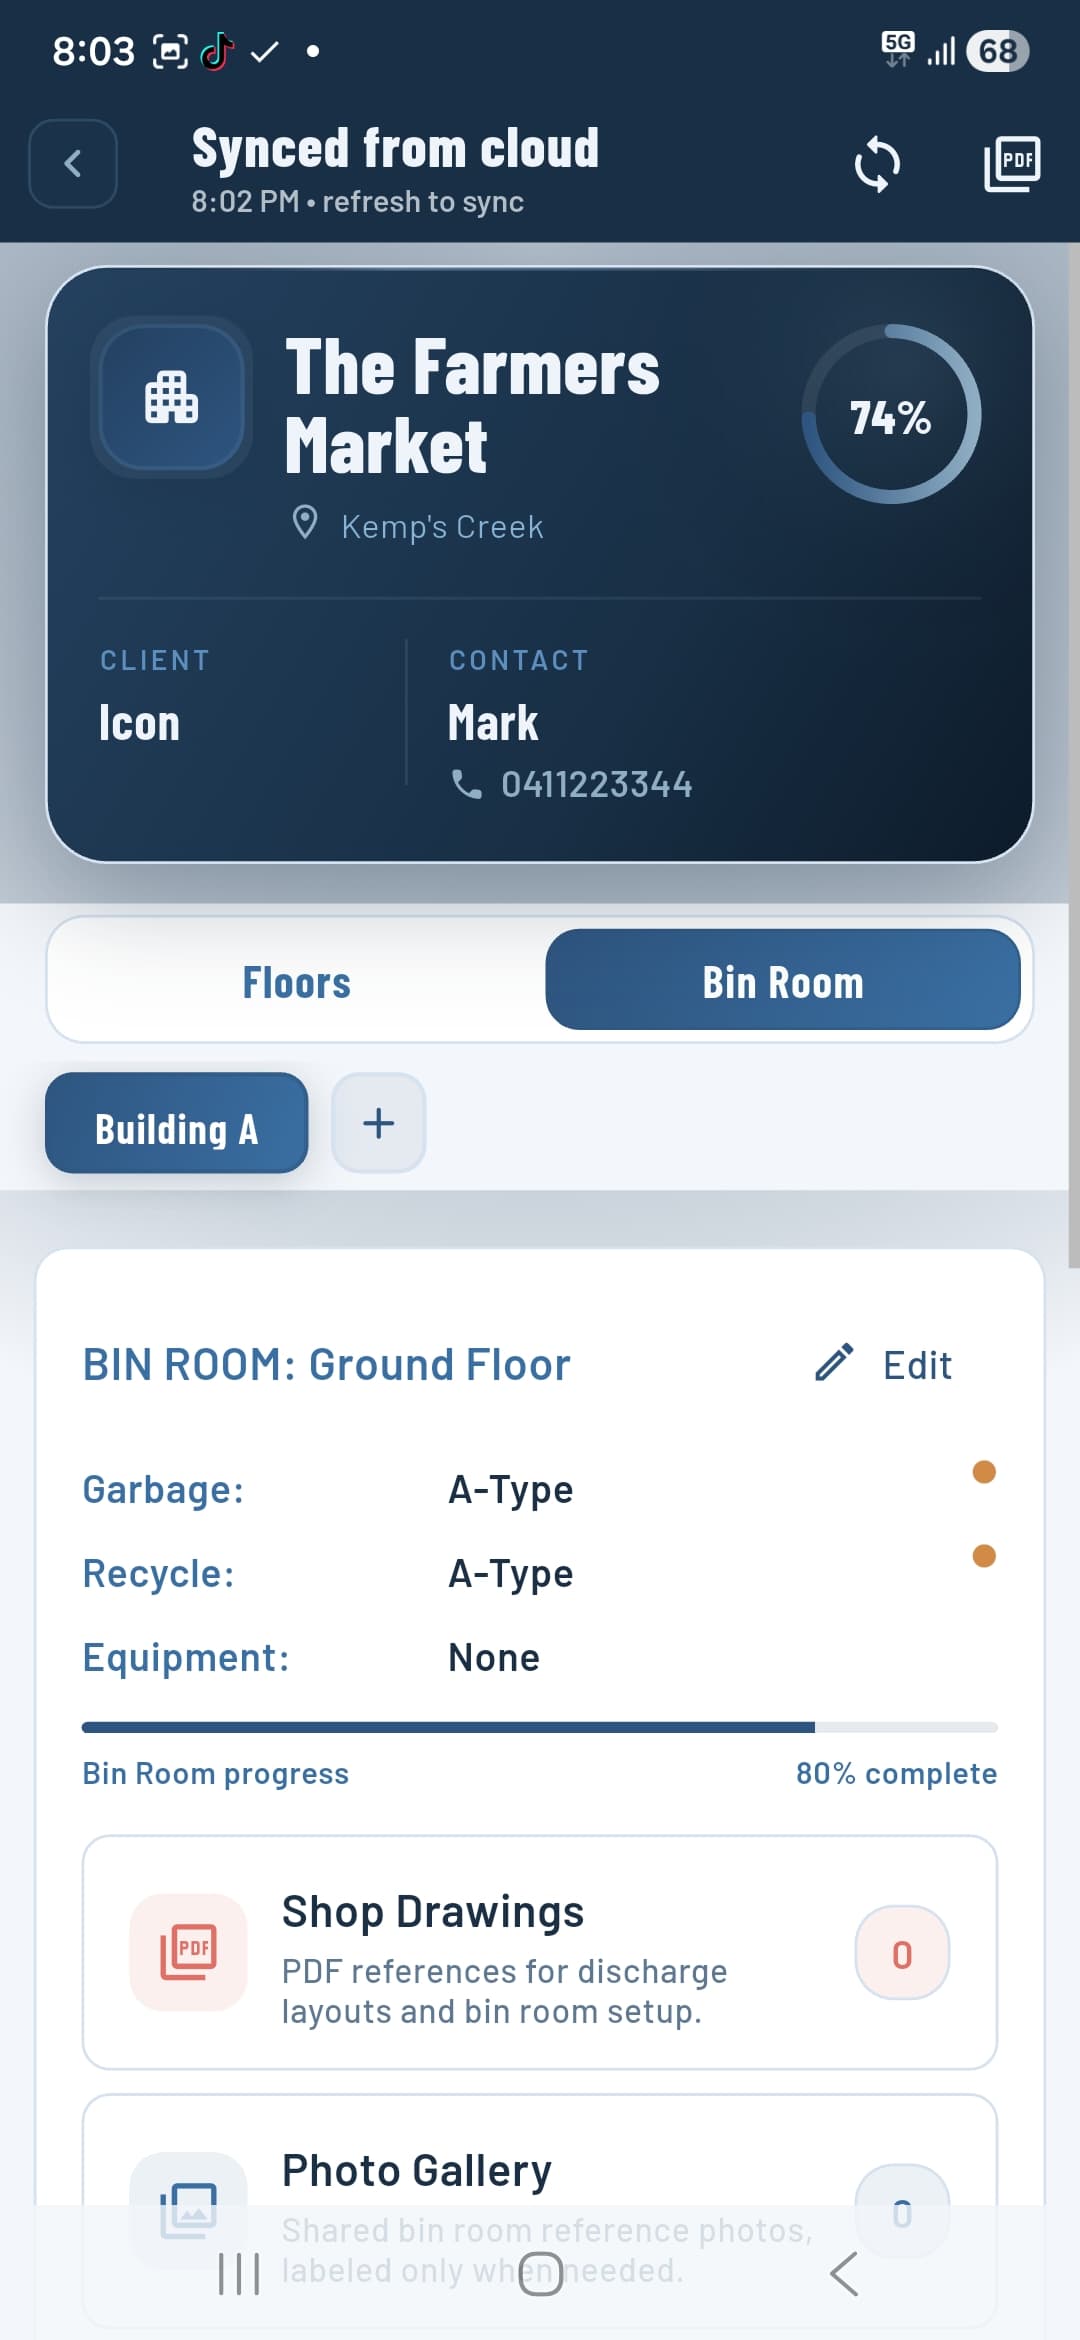
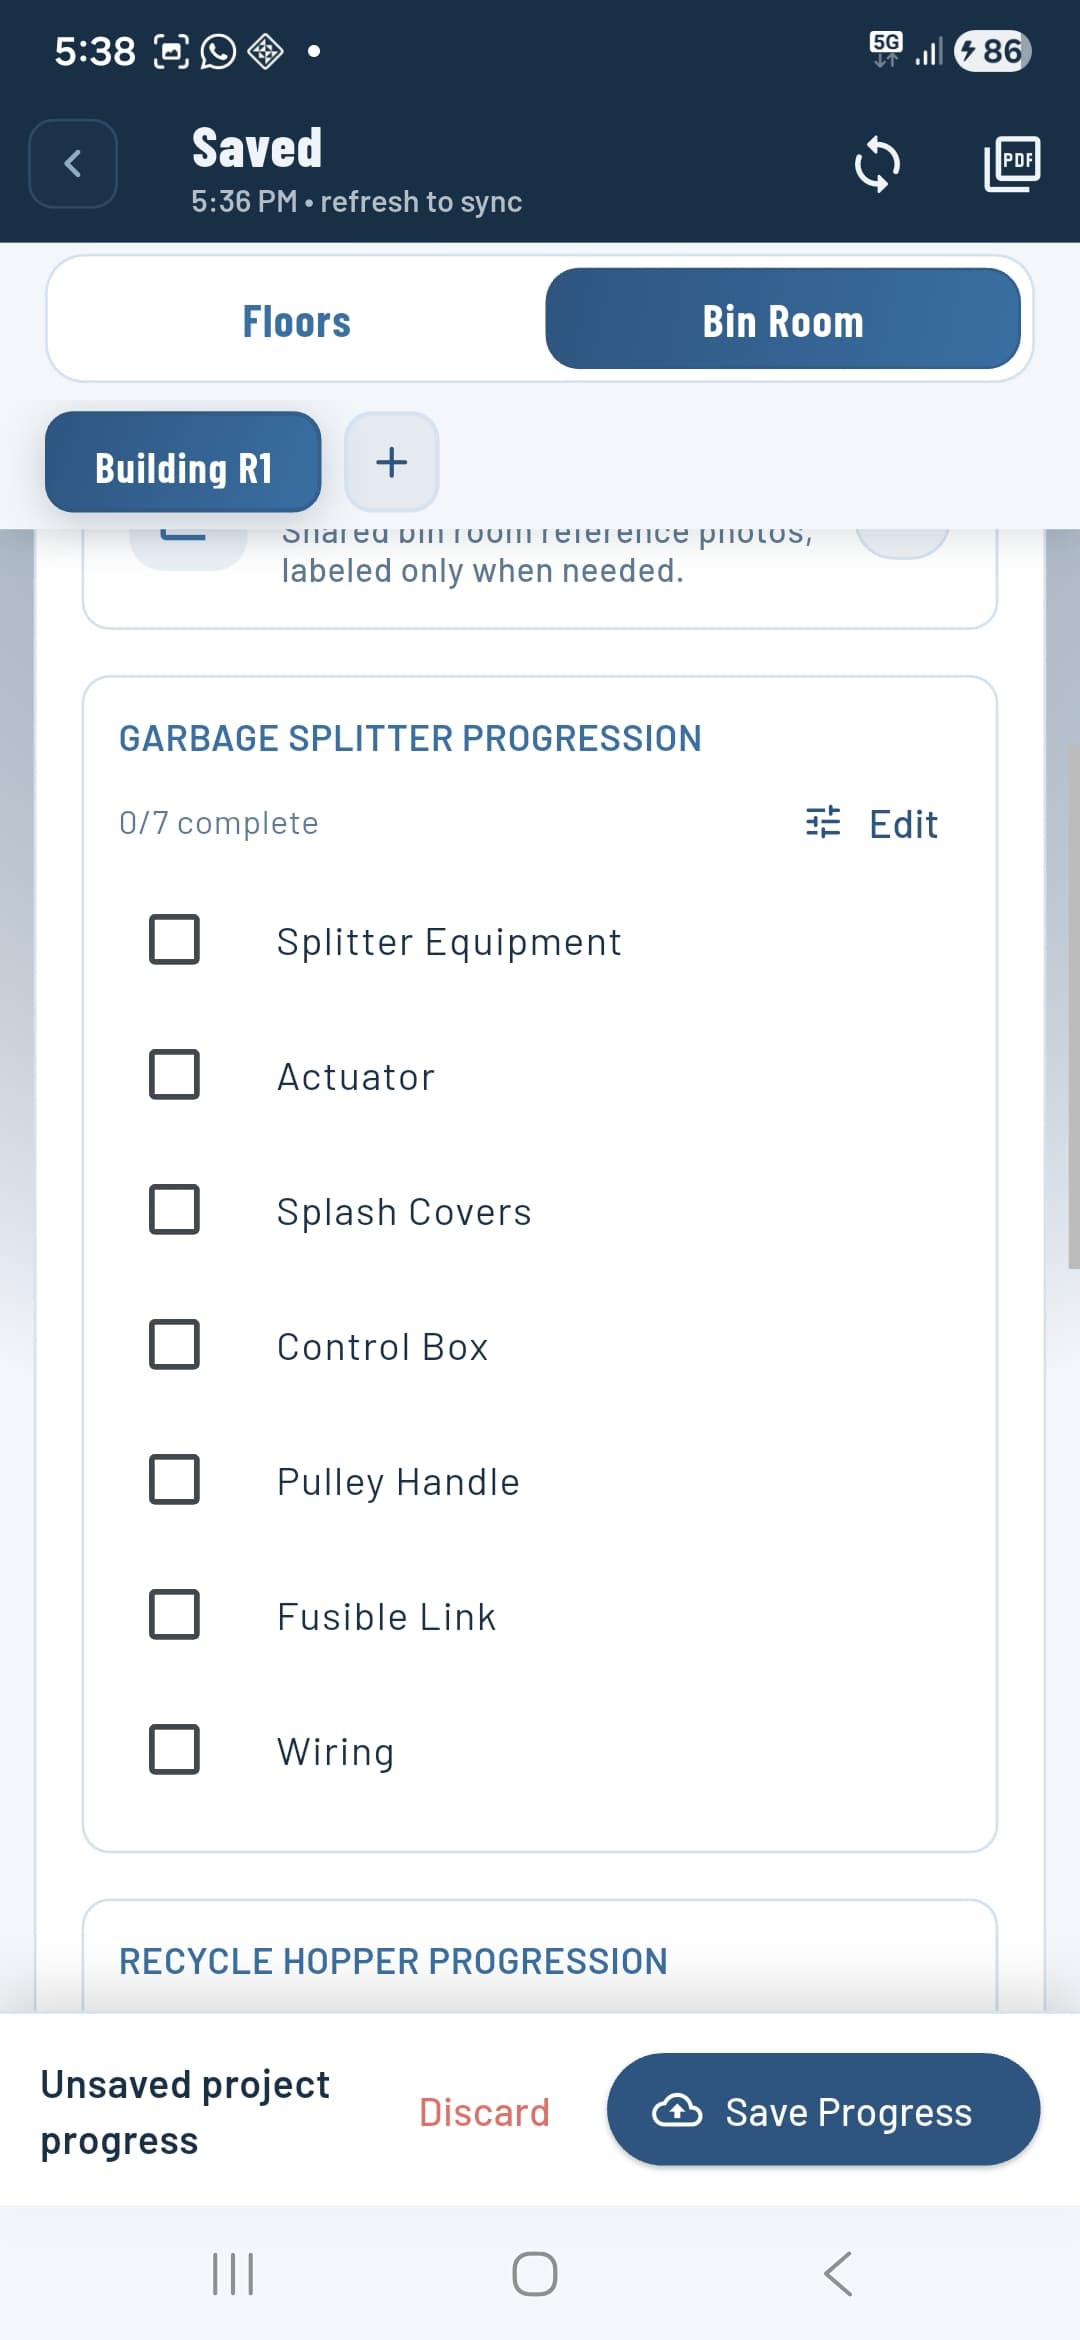
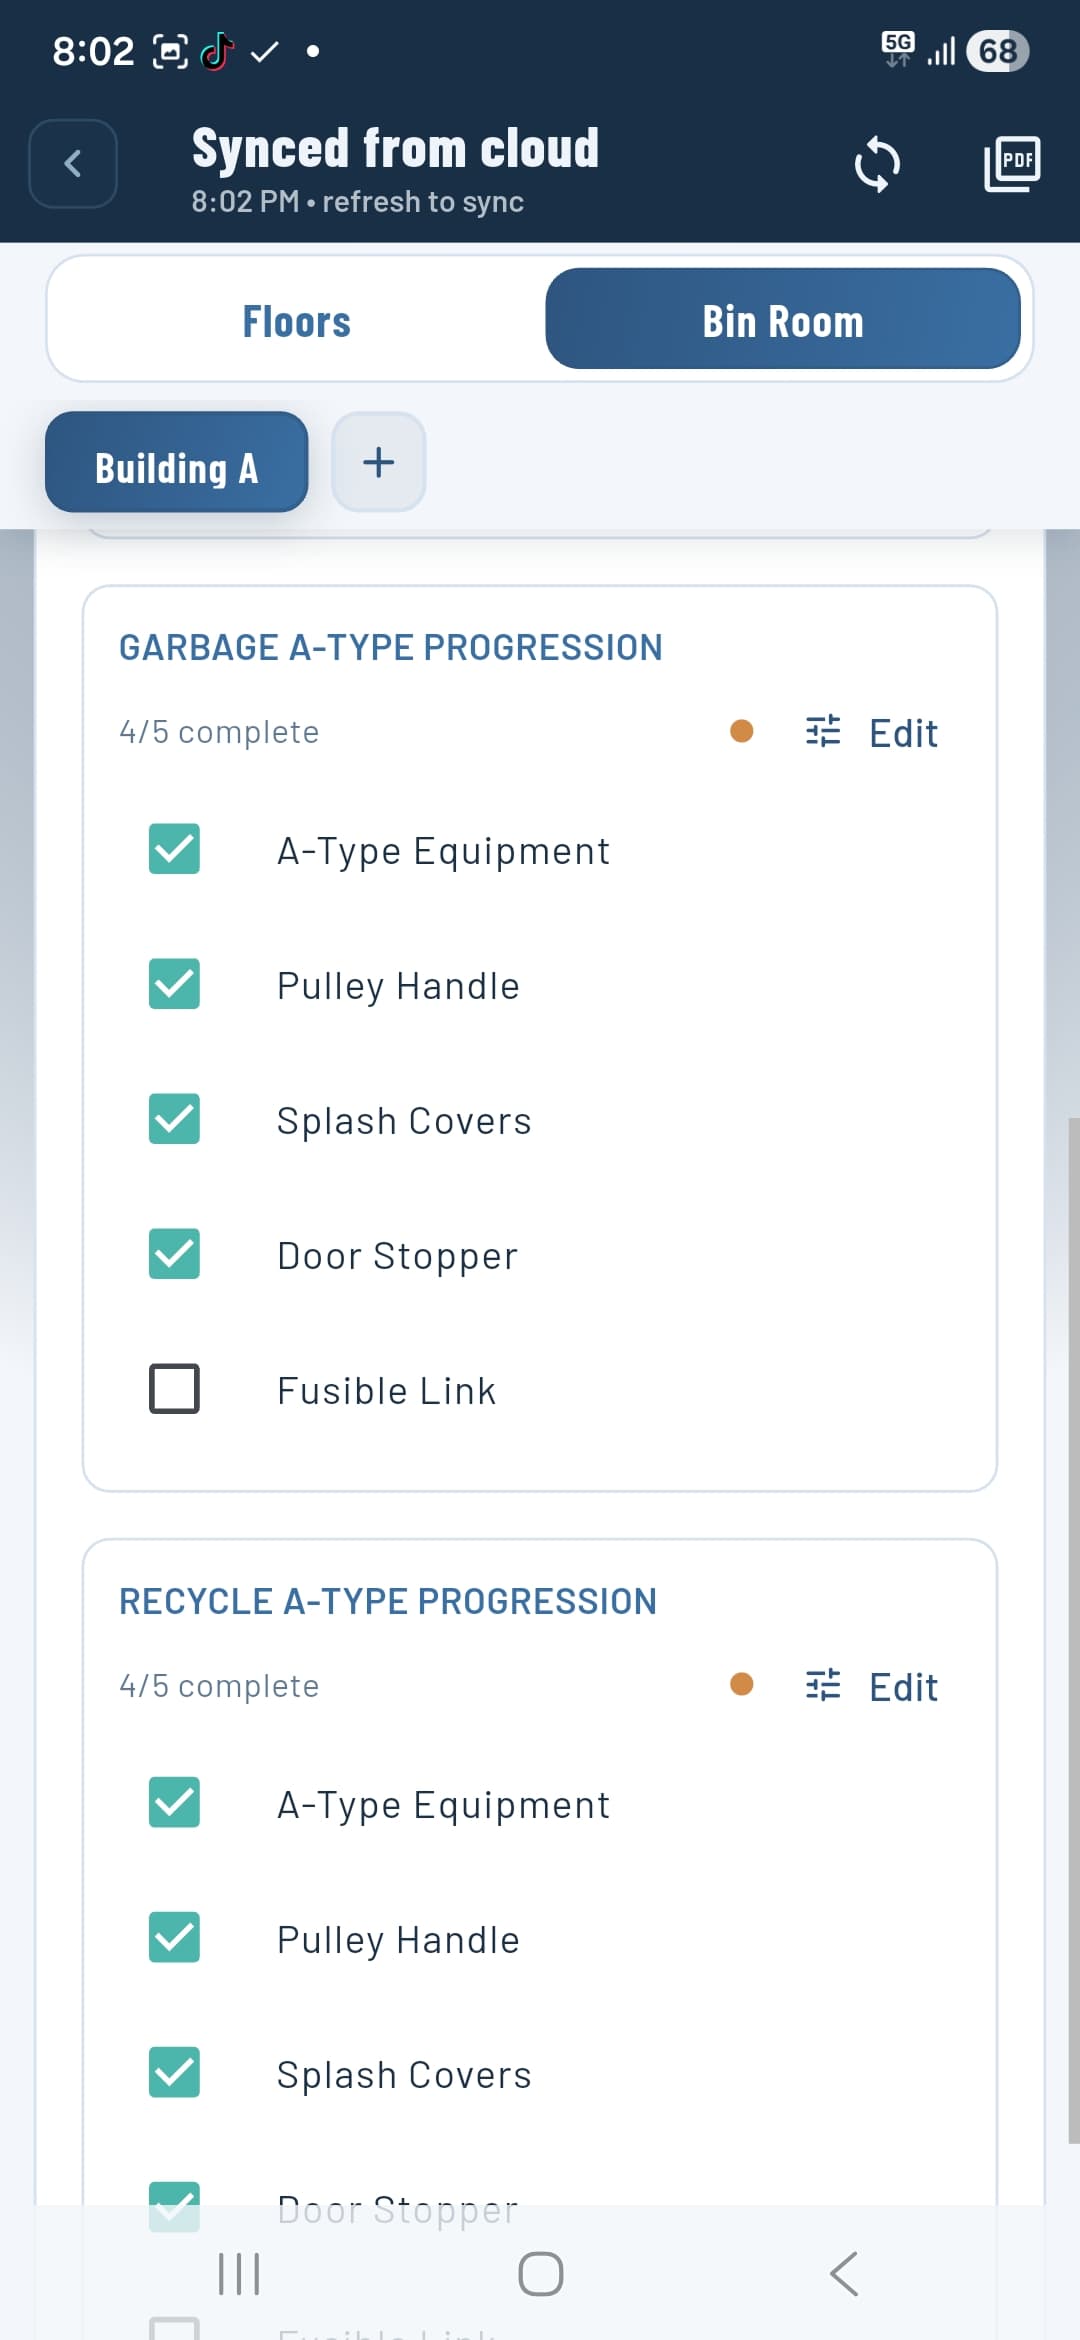
Bin room tracking
Switch to the Bin Room tab inside a project. Select a building to see the bin room configuration — discharge types, equipment, and a progress percentage separate from the floor progress.
Each equipment type has its own Progression checklist. For example, a Garbage Splitter shows: Splitter Equipment, Actuator, Splash Covers, Control Box, Pulley Handle, Fusible Link, and Wiring. Tick each component as it is installed. The count (e.g. 0 / 7 complete) updates automatically.
Tap Edit next to a progression to customise which components appear — useful when a site has non-standard equipment.
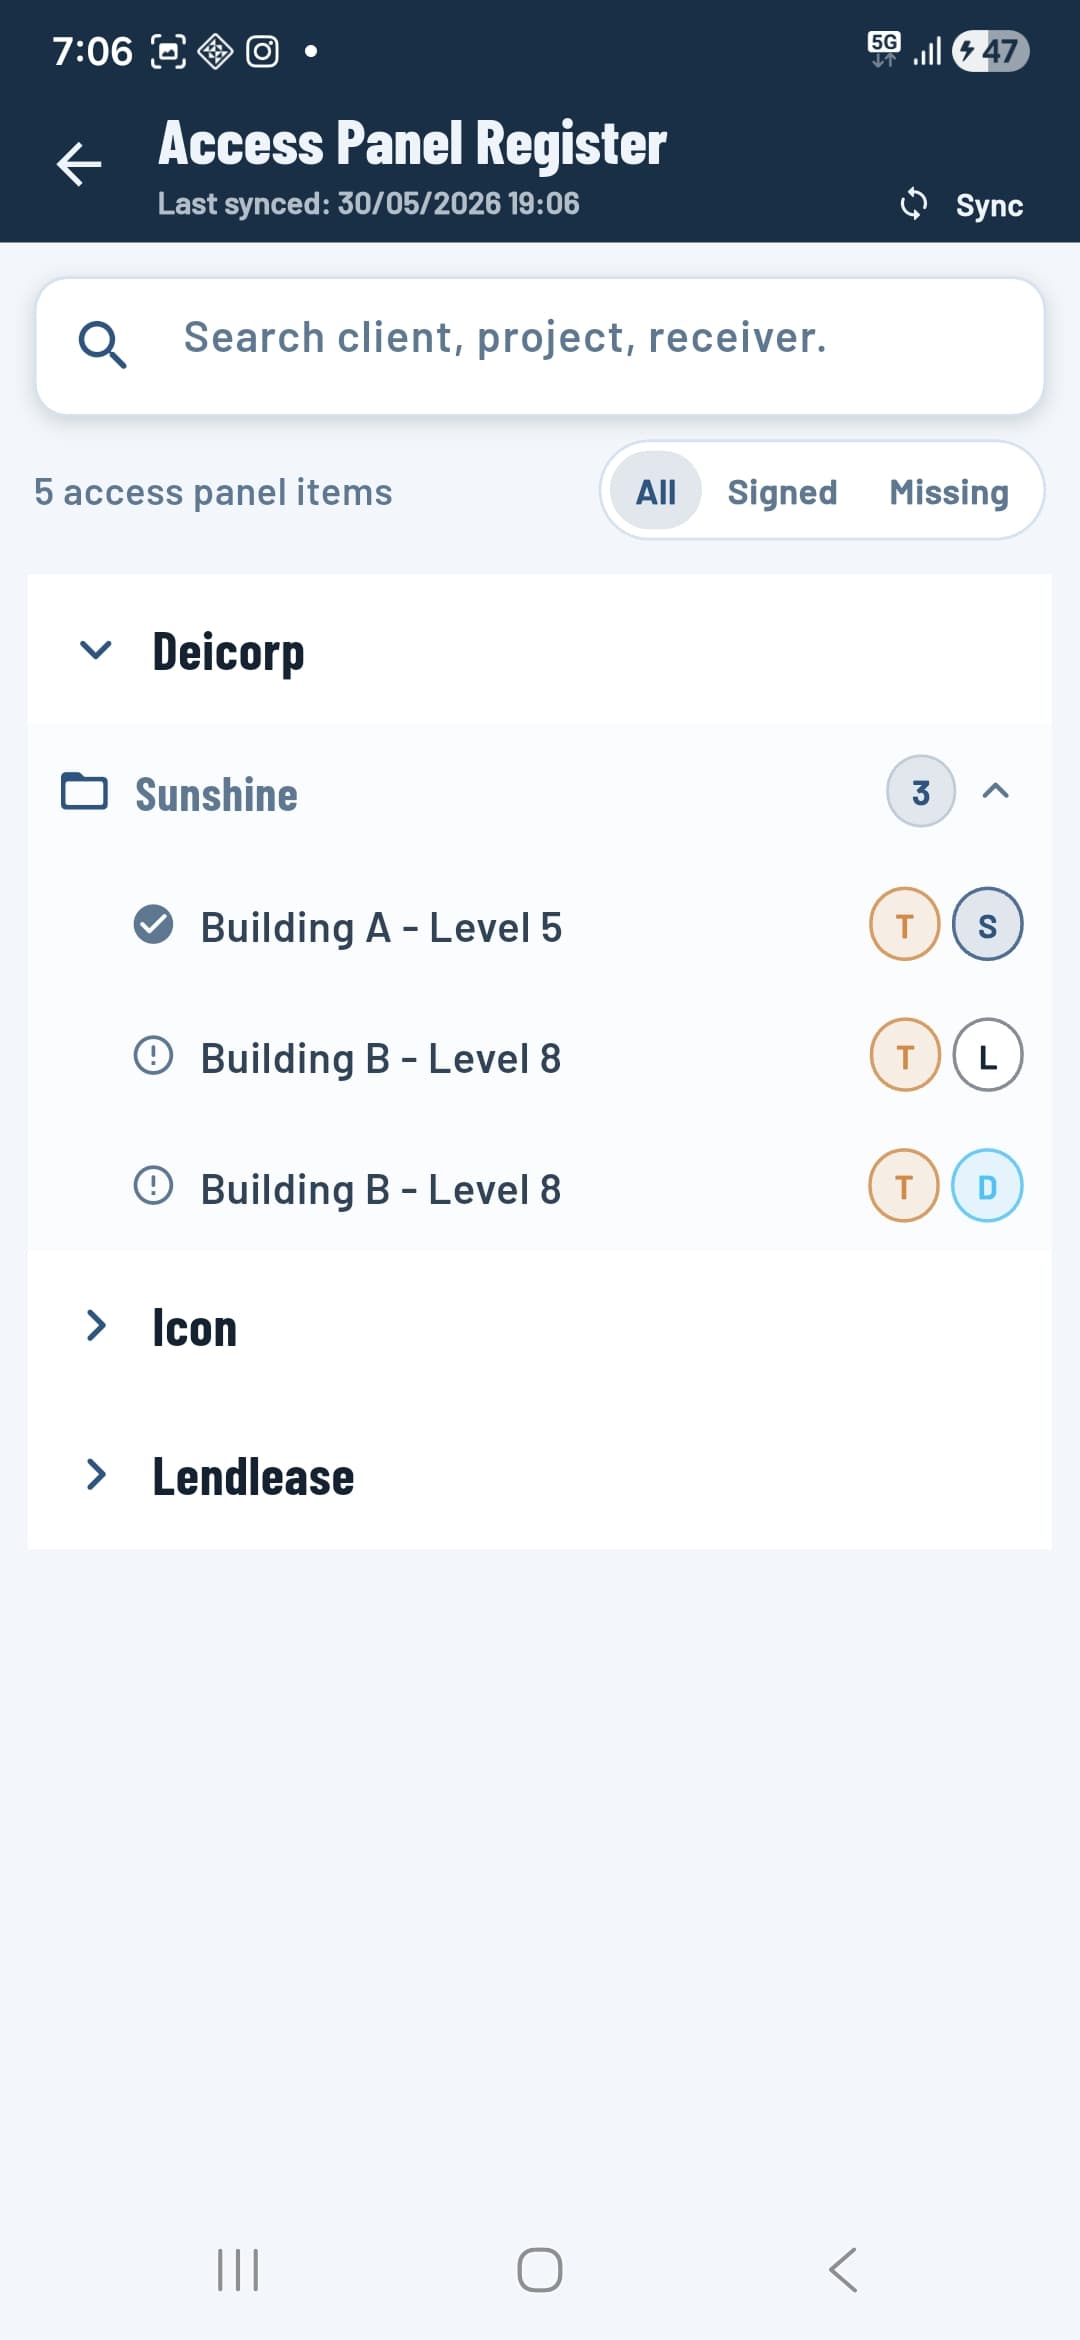
Access panel register
The register is a workspace-wide view of every signed access panel handover across all projects. Open it from the workspace menu (bottom of the home screen). Records are grouped by client, then by project.
Use the All / Signed / Missing filter to quickly find outstanding handovers. Search by client name, project, or receiver. Tap any record to see a detail card with the receiver, panel count, date, and submitting user — then choose to Open, Share, Print, or Delete.
Tap Sync at the top right to pull the latest records from the server.
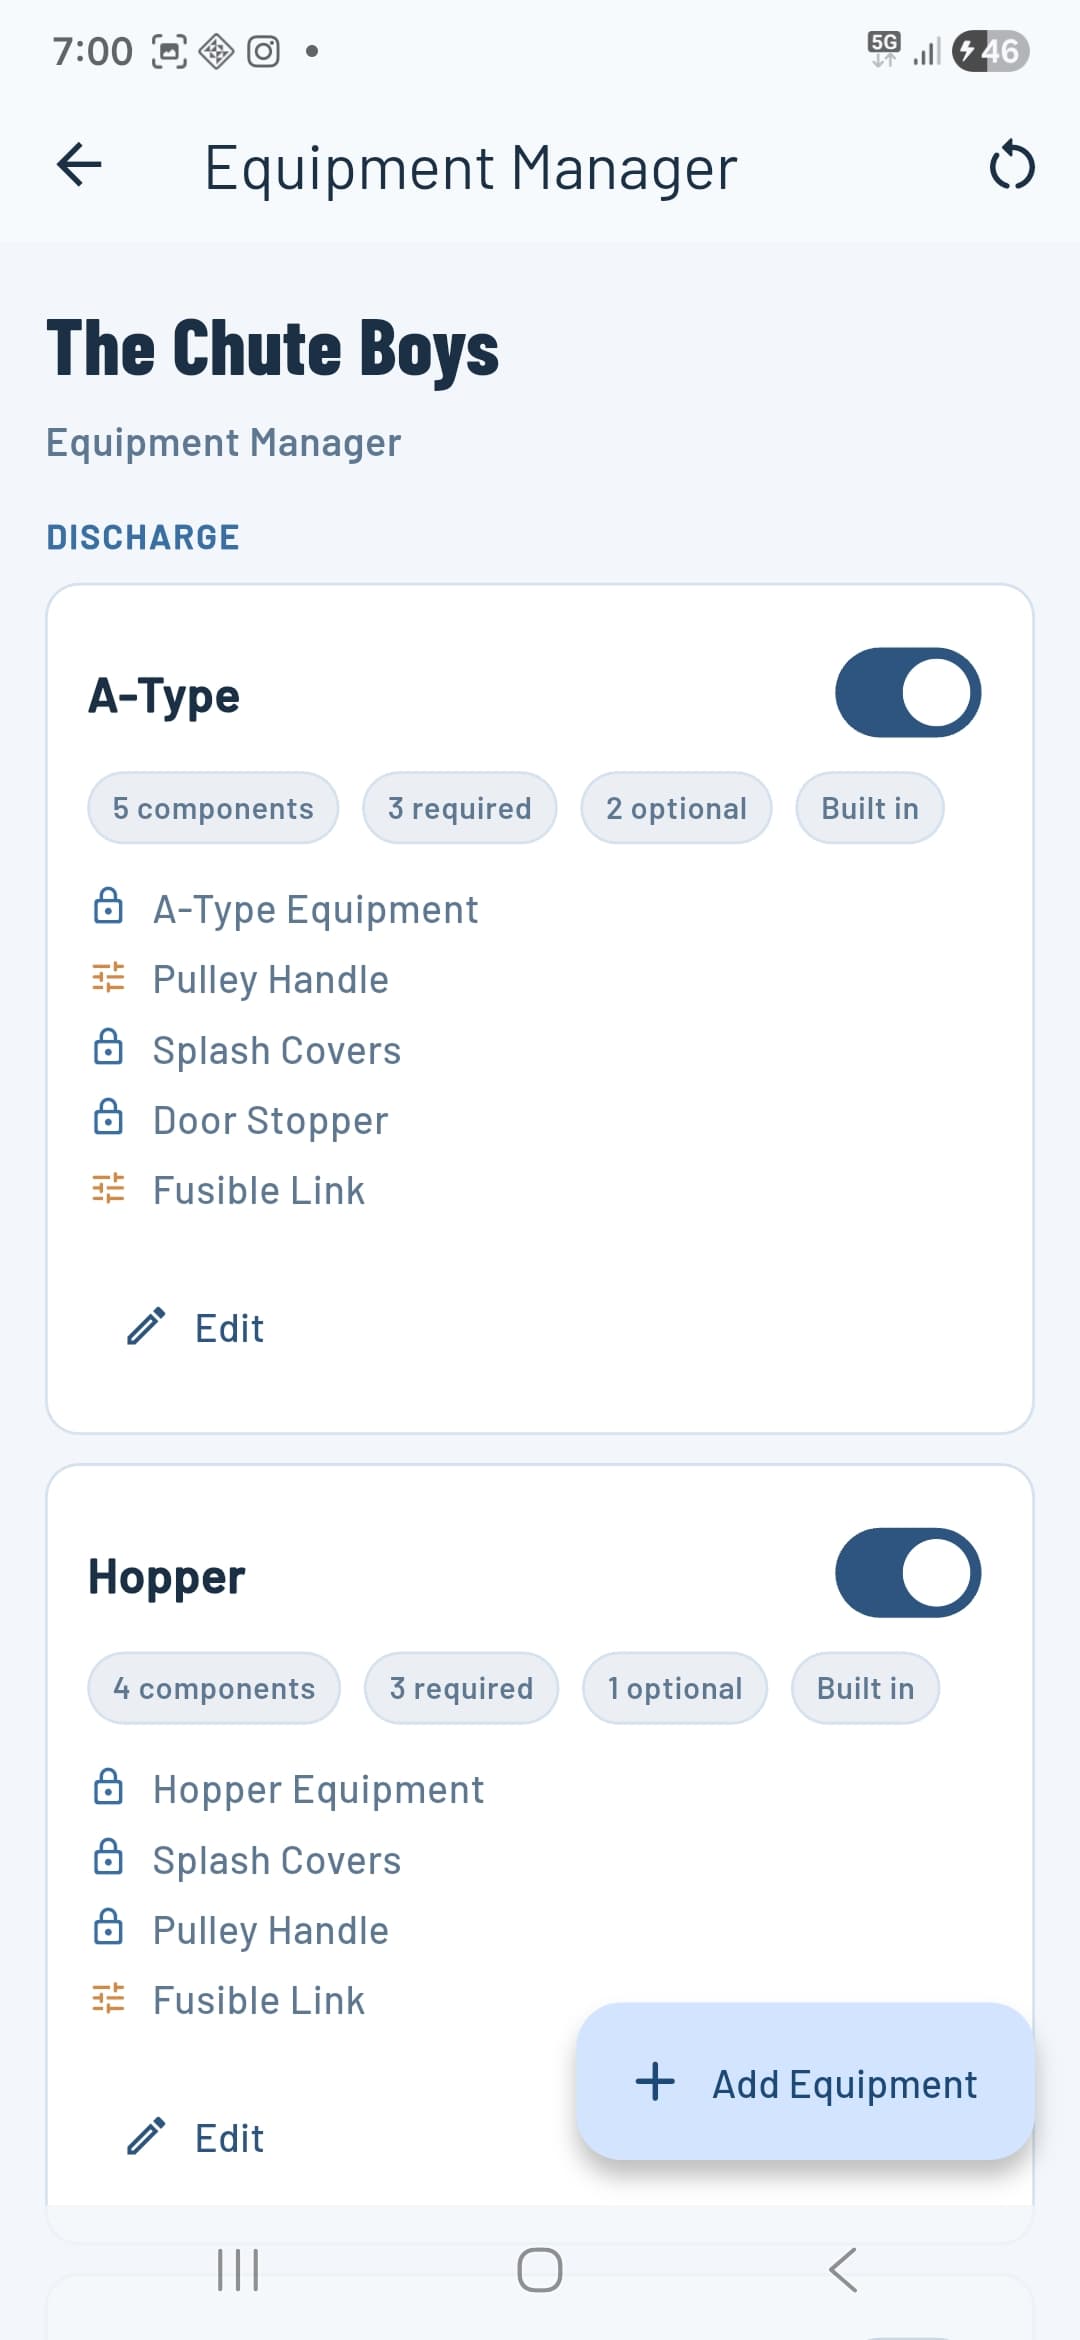
Equipment manager
The Equipment Manager lets workspace owners and admins control which bin room equipment types are available when setting up buildings. Open it from the workspace menu.
Each equipment type shows its component list, how many are required vs optional, and whether it is built-in (locked) or custom. Toggle an equipment type off to hide it from the bin room setup wizard without deleting it. Tap Edit to adjust components on a custom type.
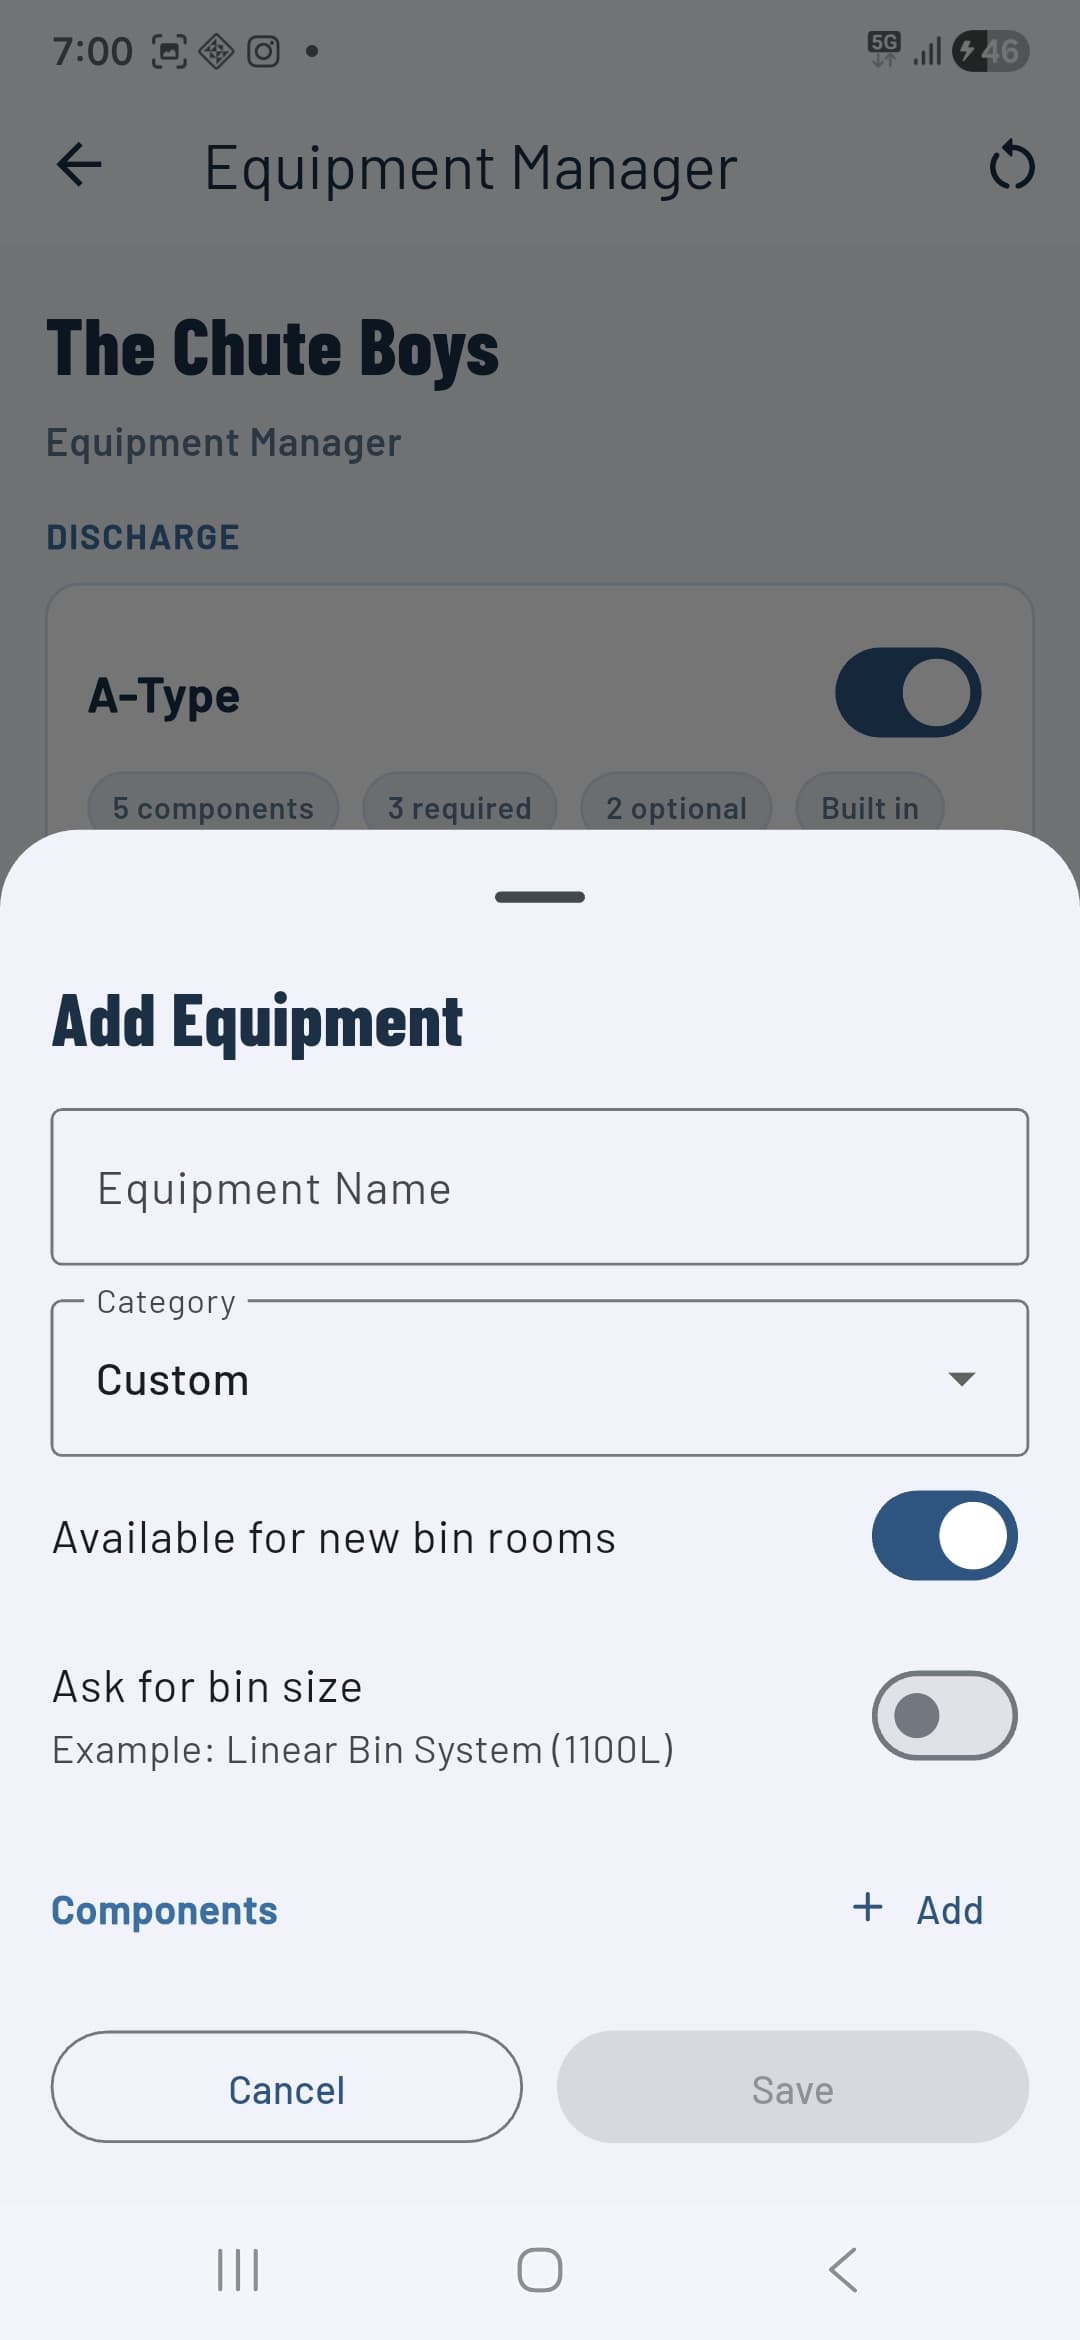
Tap + Add Equipment to create a new type. Give it a name, choose a category (Custom or one of the built-in categories), and add components. Turn on Ask for bin size if the manager or supervisor setting up a building should specify the bin capacity when selecting this equipment for a bin room.
Workspace management
Tap your workspace name on the home screen to open the workspace menu. From here you can:
- Join with Invite Code — Paste an invite code generated by an owner or manager to join another workspace.
- Scan Invite QR — Scan a personal QR code shown by another user to join their workspace instantly.
- Equipment Manager — Manage the bin room equipment types available to your workspace.
- Access Panel Register — View all signed access panel records across your workspace.
- Manage Current Workspace — Invite users, view your profile, and archive the workspace (owners only).
Inviting users
Open Manage Current Workspace and tap the Invite User button in the bottom right. You can also generate invite codes directly from the web dashboard at binchutes.com — useful for owners who want to set up their team before anyone downloads the app.
Each invite generates a unique BC-XXXXXX code. Share the code with your team member — they open the app, tap Join with Invite Code from the workspace menu, and paste it to join.
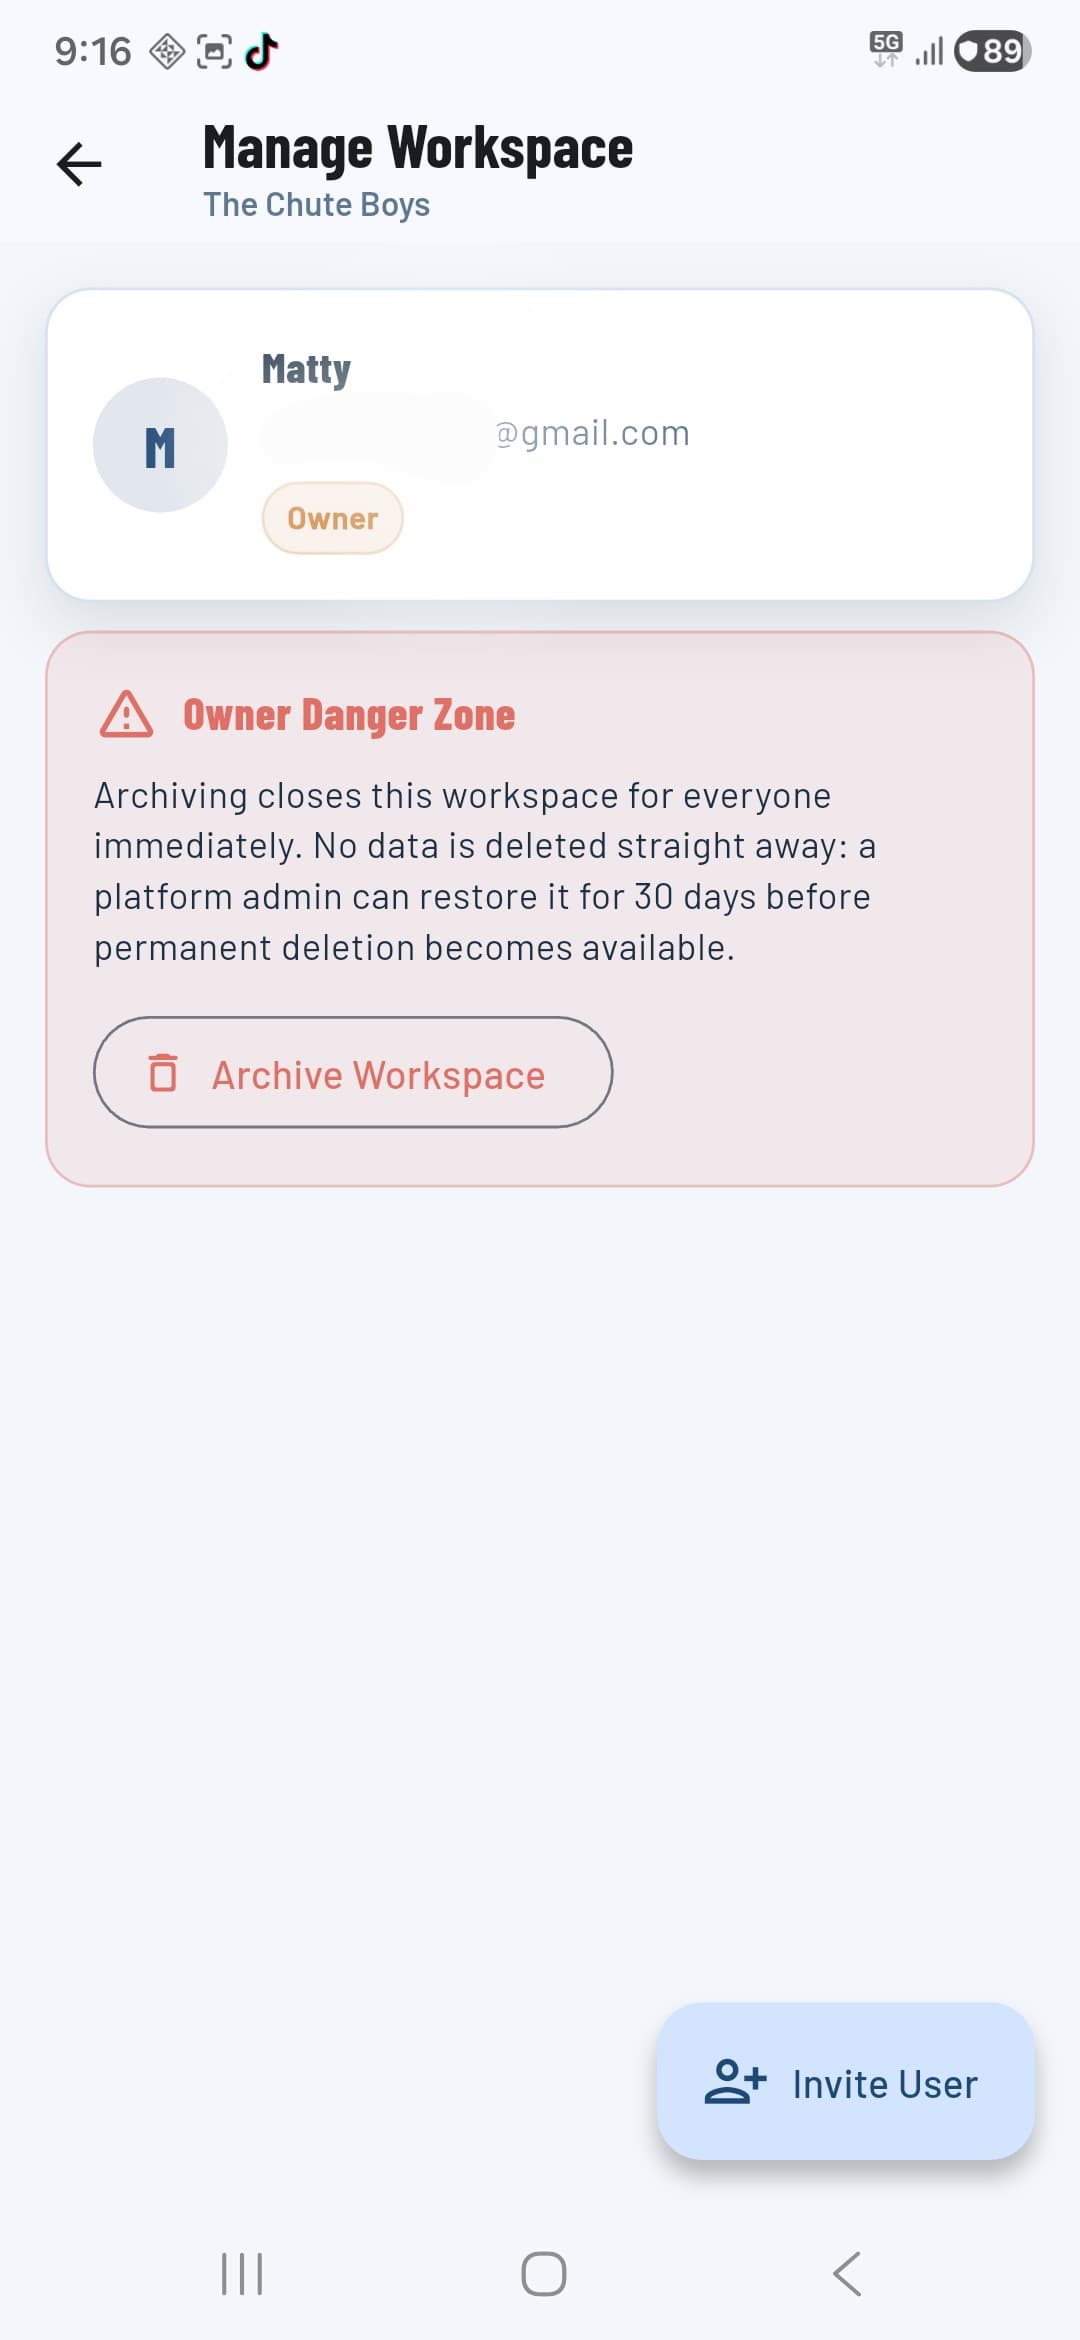
Archiving a workspace
The Owner Danger Zone section in Manage Workspace contains the Archive Workspace button. Archiving closes the workspace for all members immediately — no one can access it once archived. Workspace data is retained for 30 days before permanent deletion, during which a platform admin can restore it if needed.
Archiving happens automatically when a subscription is cancelled.